Dens invaginatus is an anomaly of the tooth formation, its root canal treatment is a real challenge due to the severe complex of root anatomy. This paper reports the nonsurgical endodontic management of three cases of maxillary lateral incisor with type I, II and III dens invaginatus, necrotic pulp and periapical lesion. Cone Beam Computed Tomography (CBCT) was used to get a three-dimensional observation of this area. The use of dental operating microscope and ultrasonic tips helped us to eliminate the invagination safely.
Genetic disorders or environmental factors during tooth formation can cause tooth abnormalities [1]. Dens invaginatus has been defined as a defect in tooth development, characterized by invagination of the enamel organ into the dental papilla before the calcification phase [2-7]. Several terms have been used to define this malformation such as dens in dente, dilated composite odontoma, dens invaginatus. This is probably due to the lack of consensus on its formation, etiology and classification [4]. Its frequency is reported to be 0.04-10% by Heydari A, et al. [3]. Many classifications were proposed but the one by Oehlers (1957) is probably the most clinically relevant [5].
Type I: invagination confined inside the crown, not extending beyond the cemento-enamel junction (CEJ).
Type II: invagination extends beyond the CEJ, it may or may not communicate with the pulp and not reach the periradicular tissue.
Type IIIA: Invagination extends beyond the CEJ penetrating the root and communicates laterally with the periodontal ligament space through a pseudo-foramen. There is usually no communication with the pulp, which lies compressed within the root.
Type IIIB: Invagination extends through the root and communicates with the periodontal ligament at the apical foramen. There is usually no communication with the pulp [2,6].
An 18-year-old female was referred by her general dental practitioner to the Department of Restorative Dentistry and Endodontics, University of Dental Medicine, Monastir, Tunisia.
The patient dental history revealed pain related to the right maxillary lateral incisor since 5 years, and every time she consulted, her doctor prescribed antibiotics and analgesics.
Then, she consulted another private dental practitioner who opened a very decayed access cavity in the tooth 12 and the 11, left the teeth open and referred her to our department.
Clinical examination revealed a cone-shaped lateral right incisor (Figures 1a,b). The tooth was sensitive on palpation and percussion. Discoloration was present and the tooth did not respond to cold vitality test. Radiographic examination including panoramic and periapical films showed a dens invaginatus type II with a large periapical radiolucency (Figures 2 and 3).
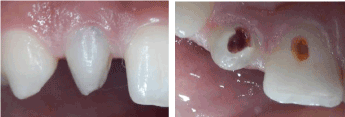
Figure 1: Buccal and palatal views of the right maxillary lateral incisor.
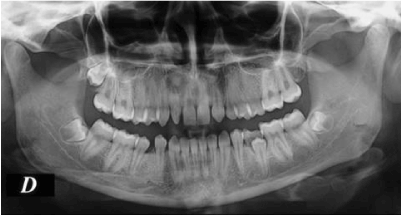
Figure 2: Panoramic radiograph.
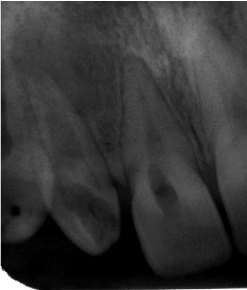
Figure 3: Periapical radiograph.
Our diagnosis was pulp necrosis with acute apical periodontitis in a type II dens invaginatus. Thus conventional root canal therapy was indicated. A cone-beam computed tomography (CBCT) scan was indicated to observe the three-dimensional image of this complex anatomy.
As an emergency treatment, the central canal of tooth 12 was prepared with #10, #15 and #20 K-files (Dentsply Maillefer, Ballaigues, Switzerland) until possible working length and disinfected with 5.25% sodium hypochlorite (NaOCl). It was wide in the apical part of the root.
The root canal of tooth 11 was also disinfected with NaOCl and instrumented with rotary Protaper (Dentsply Maillefer). Then calcium hydroxide was mixed and inserted into the teeth’s roots, and the access cavities were temporarily sealed with Cavit.
The analysis of CBCT showed a very large periapical lesion, a type II dens invaginatus and a very decayed access cavity in tooth 12 (Figures 4a,b,c,d).
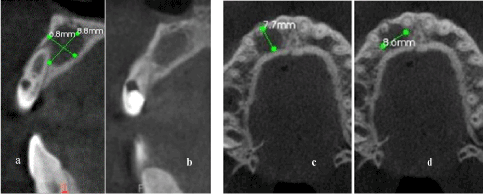
Figure 4: (a)(b) Sagittal CBCT sections. (c)(d) Axial CBCT sections.
In the next appointment after 15 days, the patient had no pain. After rubber dam isolation, microscope examination (Carl Zeiss, Oberkochen, Germany) revealed an invaginatus centered in the middle of the root canal and perfectly individualized (Figure 5a). By the use of ultrasonic tip #ET180 we eliminated the invagination. So, the canal became wide from the coronal part to the apical one (Figure 5b). Then, it was instrumented with Protaper rotary files (Dentsply Maillefer) and disinfected. Working lengths were determined using #20 K-files and periapical radiograph (Figure 6a). Final irrigation was done using: NaOCl 5.25%, EDTA 17% and Clorhexidine 0.2% with physiological serum between each solution to prevent interactions.
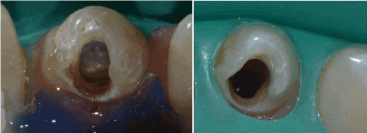
Figure 5: (a) Clinical view of the invagination. (b) Clinical view after elimination of the invagination.
In tooth 11, the canal was filled using thermoplasticized gutta-percha with #25 Revo Condensor (Micro Mega) with epoxy matrix endodontic cement (Acroseal, Septodont).
In tooth 12, master cone was #35 .06. The apical third was filled with lateral condensation of gutta-percha and the middle and the coronal regions were filled using Revo Condensor #25 and the same cement (Figure 6b). Two weeks after completion of endodontic treatment, patient had no pain and the teeth were restored using composite resin (Z350 XT, 3M ESPE).
A follow up after 4 months showed the healing of the apical lesion (Figure 6c).
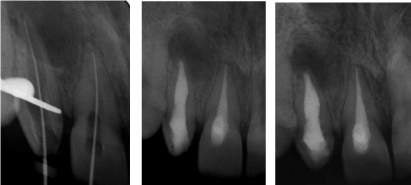
Figure 6: (a) Working length determination. (b) Immediate post-operative radiograph. (c) Follow up image after 4 months.
A 17-year-old girl presented to the Department of Conservative dentistry and Endodontics, University of dental medicine, Monastir, Tunisia for pain related to the anterior maxillary segment.
Her medical history was non-contributory, and her dental history revealed medium oral hygiene with the evidence of active plaque and calculus. On clinical examination, the palatal surface of the right maxillary lateral incisor had a tuber on its mesial side (Figure 7). The tooth 12 was very sensitive on palpation and percussion. No discoloration was present and the tooth did not respond to cold vitality test.
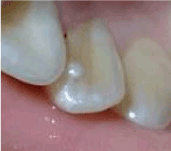
Figure 7: The tuber in the palatal surface.
A periapical radiograph revealed the presence of a dens invaginatus type I (Figure 8a). According to the clinical and radiographic examination, the diagnosis was pulp necrosis with an abscess developed within an existing chronic apical periodontitis.
Access cavity was opened under rubber dam (Figure 8b). The abscess was drained through the canal. The canal was negociated using K-files #10, #15 and #20 and disinfected with 5.25% NaOCl. Antibiotics (Amoxicillin 500 mg 2cp x 2/day for 7 days) and analgesics (Pracetamol 500mg 1cp x 3/day for 5 days) were prescribed. The tooth left open for 2 days.
In the next appointment, the canal was instrumented with Protaper rotary files and the working length was determined with file in place radiograph (Figure 8c). Calcium hydroxide was inserted into the canal and the access cavity was temporarily sealed with Cavit.
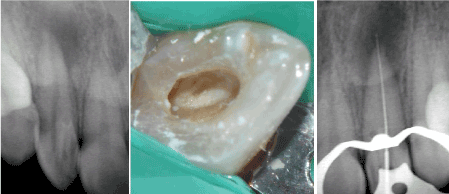
Figure 8: (a) The access cavity showed the enamel of the invagination (b) Periapical radiolucency around the apex of the lateral incisor with type I dens in dente. (c) Working length determination.
Unfortunately, the patient was not motivated. She missed her next appointment. She came back to our department 15 months later for acute periapical periodontitis related to the same tooth. So, we cleaned and shaped the canal and put calcium hydroxide and Cavit. For the second time, the patient was lost from sight for almost 5 months. Then she came back because of the loss of the temporary filling material. Cleaning and shaping was done with good disinfection and calcium hydroxide was inserted with Cavit. After these 20 months the periapical radiograph showed a complete healing of the apical lesion (Figure 9a).
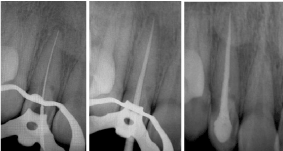
Figure 9: (a) File in place radiograph after 20 months revealed a complete healing of the periapical lesion. (b) Master cone in place radiograph. (c) Immediate post-operative radiograph.
In the next appointment after 15 days, obturation was done with lateral condensation of gutta-percha cones and epoxy matrix endodontic cement (Acroseal, Septodont) (Figures 9b,c). One week later, the tooth was asymptomatic and was restored using composite resin (Z350 XT, 3M ESPE).
A 20 year-old female was referred to our department by the department of prosthodontics for endodontic treatment of the left maxillary lateral incisor.
The patient came to their department for veneers in her maxillary lateral incisors. After radiographic examination, her prosthodontist discovered a periapical lesion related to tooth 22 with abnormal root canal anatomy.
We started by clinical examination. As shown in Figure 10 maxillary lateral incisors were cone-shaped. The tooth 22 was asymptomatic. There was no sensitivity on palpation or percussion. Vitality cold test was normal. Periodontal probing was normal, no mobility was detected. Examination of the periapical radiograph showed complex tooth anatomy with periapical radiolucency (Figure 11). Our diagnosis was a normal pulp on the main canal space and a necrotic pulp related to the Type III dens invaginatus with asymptomatic periapical periodontitis [6]. CBCT was indicated for better understanding of the root anatomy.
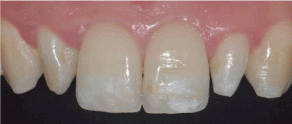
Figure 10: Buccal view of the anterior maxillary segment.
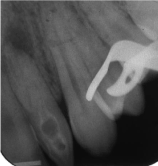
Figure 11: Periapical radiograph showing a type III dens invaginatus.
CBCT showed a type III dens invaginatus with periapical radiolucency. As we can see in sagittal sections, the main canal presented calcification in the medium part of the root and the invagination canal presented enamel on its coronal part (Figure 12).

Figure 12: Sagittal CBCT sections.
So, we decided to conserve the vitality of the main canal and to achieve endodontic treatment of the necrotic pulp of the invagination.
After local anesthesia, rubber dam was placed and access cavity was performed under operative microscope. Once the canal of the invagination was found, we used ultrasonic tips to remove the enamel inside the tooth. Cleaning and shaping were performed using iRace files (FKG) and 5.25% NaOCl. Working length was determined using #20 K-files and periapical radiograph (Figure 13a). Calcium hydroxide was used as intracanal medication for 2 weeks.
In the next appointment, the tooth was asmptomatic so we obturated the canal of the invagination with warm vertical condensation technique after final irrigation with NaOCl 5.25%, EDTA 17% and Chlorhexidine 0.2% (Figure 13b).
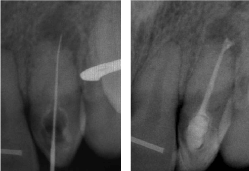
Figure 13: (a) Working length determination. (b) Immediate postoperative radiograph.
Dens invaginatus is a rare malformation resulting from an infolding of the dental papilla during tooth formation [7]. Clinically, unusual crown morphology or deep coecum foramina are very important indications. However, they are not consistent evidence and we cannot make our diagnosis of dens in dente. Only radiographic examination is determinant.
As the permanent lateral maxillary incisors are the most affected teeth [7], they should be carefully explored with clinical and radiographic assessment in order to diagnose dens invaginatus. In most of cases, this affection is bilateral so the contra lateral tooth should be also examinated.
Many treatment options have been suggested in the literature. For asymtomatic teeth with vital pulp and without periapical lesion, sealing of the invaginated pit with flowable resin is indicated whereas for necrotic pulp, nonsurgical endodontic treatment must be the first alternative. In cases of large periapical lesions not resolved nonsurgically or failure to gain coronal access, endodontic surgery still the last treatment option [5,2].
Internal anatomy of invaginated teeth is very unpredictable especially in type II and III. Therefore, the use of CBCT and microscope during treatment is vital. In fact, conventional radiographs are insufficient in most cases because it shows two-dimentional view of a three-dimentional structure [5,8].
This report presented three cases of type I, II and III dens invaginatus with necrotic pulp and periapical lesion. Desinfection was crutial to promote healing of periradicular tissues. In these cases, sodium hypochlorite for irrigation, during instrumentation, and calcium hydroxide as intracanal medication were used [9]. It has high alkalinity which facilitates healing in cases of necrotic pulp with periapical lesion [8]. As final irrigation protocol, we used NaOCl for its ability to dissolve organic tissues followed by EDTA which demineralize the smear layer. That will expose dentinal tubules and collagen fibers so we used NaOCl for a second time to deeply remove the organic tissues. Finally, Chlorhexidine 0.2% was used for its bacteriostatic action. It is antibacterial at a concentration of 2% and it cannot dissolve organic component or eliminate the smear layer [10].
When the pulp of the main canal still vital it is important to conserve it. As shown in the third case we can treat only the invagination. This requires the necessary equipment as operative microscope and ultrasonic tips.
Follow up is important to see if there is healing of the apical lesion. If not, then endodontic surgery would be indicated.
Knowledge of the existence, diagnosis and treatment alternatives of dens ingavinatus is very important for successful endodontic management [9].
- Forghani M, Farooji EM, Abuchenari J, Bidar M, Eslami N (2015) Conservative treatment of an invaginated maxillary lateral incisor with a C-shaped canal using Cone-Beam Computed Tomography. Iran Endod J 10: 281-283. [Crossref]
- Jaramillo A, Fernández R, Villa P (2006) Endodontic treatment of dens invaginatus: a 5-year follow-up. Oral Surg Oral Med Oral Pathol Oral Radiol Endod 101: e15-21. [Crossref]
- Heydari A, Rahmani A (2015) Treatment of dens invagination in a maxillary lateral incisor: A case report. Iran Endod J 10: 207-209. [Crossref]
- Gonçalves A, Gonçalves M, Oliveira DP, Gonçalves N (2002) Dens invaginatus type III: report of a case and 10-year radiographic follow-up. Int Endod J 35: 873-879. [Crossref]
- Kato H (2013) Non-surgical endodontic treatment for dens invaginatus type III cone beam computed tomography and dental operating microscope: a case report. Bull Tokyo Dent Coll 54: 103-108. [Crossref]
- Cohenca N, Berg J (2013) Diagnosis and conservative treatment of dens invaginatus type III using cone beam computed tomography: two case reports. Pediatr Dent 35: E33-37. [Crossref]
- Hülsmann M (1997) Dens invaginatus: aetiology, classification, prevalence, diagnosis, and treatment considerations. Int Endod J 30: 79-90. [Crossref]
- Ranganathan J, Rangarajan Sundaresan MK, Ramasamy S (2016) Management of Oehler's Type III Dens Invaginatus using cone beam computed tomography. Case Rep Dent 2016: 3573612. [Crossref]
- Gathani KM, Raghavendra SS, Wadekar S (2016) Endodontic Management of Type III Dens Invaginatus with an Open Apex. J Clin Diagn Res 10: ZJ04-05. [Crossref]
- Violich DR, Chandler NP (2010) The smear layer in endodontics - a review. Int Endod J 43: 2-15. [Crossref]


