Medical implants are being used extensively in the treatment of many types of medical ailments. Approximately 20% of adults in the U.S. have received an implant of one type or another. The U.S. Department of Commerce states that the global market for medical devices in 2016 was $339.5 billion and predicted that it would grow to $435.8 billion by 2020. As with any man-made device, some of these implants will fail. This paper provides the fundamental knowledge required by engineering and biomechanical professionals in order to analyze why an implanted orthopedic device has failed mechanically; generally by fracture. The focus will be limited to the failure of metals that are used to fabricate orthopedic implanted devices. Information regarding the biocompatibility of various engineered materials and their interaction with tissues is also presented.
Medical implants are one of the great scientific breakthroughs and represent a growing financial sector. McCloy [1], has reported that the world-wide medical implant market exceeds $200 billion. He estimates that about 20% of adults in the U.S. have received an implant of one type or another. These numbers are substantiated by the U.S. Department of Commerce [2], which states that the global market for medical devices in 2016 was $339.5 billion and predicted that it would grow to $435.8 billion by 2020. As with any man-made device, some of these implants will fail.
The materials that comprise medical implants fail in many different ways for many different reasons. In the case of the failure of engineered materials used for implantable devices, knowledge about medicine, human biology, biomaterials, engineering and many other factors must generally be considered and investigated before any conclusions can been drawn regarding the root cause of the device failure. The primary factors that must be considered include, but are not limited to, manufacturability and manufacturing processing requirements, biocompatibility of the proposed material(s), device geometry, the in vivo and in vitro environmental factors, the normal anticipated and traumatic (if any) loading conditions, and the health and condition of the patient.
After a failed implanted device is explanted (removed) from the patient, it must be subjected to appropriate examination and tests. Perhaps the most critically important testing in cases of mechanical failure is the macro and micro examination of the failed device surface features and fracture surfaces. By using a wide array of tools and techniques, the analysis can reveal important surface features along with physical and mechanical properties of the failed device in order to determine if the device properties are consistent with those specified by the device manufacturer and ultimately determine the root cause of failure.
One of the more important analytical techniques regarding the failure of various devices is fractography. The evaluation of fracture surface features often allows the analyst to determine what if any additional tests and/or investigations are required to complete the failure analysis. For example, if fractography reveals that an explanted device has failed due to surface damage created during the surgical implantation procedure, then the termination of the investigation may be deemed appropriate. If not, then additional tools and techniques may be employed to further investigate the root cause of the failure.
Discussions regarding the history and types of implants along with the challenges of the development of biocompatible materials and related considerations are also presented. These subjects are covered in order to give the reader context in which to view the application of the tools and techniques that are generally relied upon to determine the root cause of implant failures. Without this knowledge, it may be very difficult, if not impossible, to understand the changes that are necessary to avoid future failures, and/or assist in the assignment of liability.
The U.S. Food and Drug Administration (FDA) defines medical implants as, “Devices or tissues that are placed inside or on the surface of the body.” Implants are often prosthetics intended to replace missing or damaged human body parts. Other type of implants deliver medication, monitor body functions, and/or provide support to organs and tissues that have been damaged or are failing due to natural causes.
[3] summarized research published by 24/7WallSt.com based on its examination of National Health Survey data, peer-reviewed journals, multiple professional physician services, and Securities and Exchange Commission (SEC) filings to complete a list of the most frequently implanted medical devices in the United States of America. The report contained data that included the number of procedures for each of the top 11 implantable devices implanted each year, along with the total expenditure, average cost for each procedure and the major manufacturers for each device. The findings indicated that the most implanted medical device was artificial eye lens (2.582 million lenses). Following in descending order were ear tubes (715,000), coronary stents (560,000), artificial knee joints (543,000), metal screws, plates and rods (453,000), intra-uterine devices (425,000), spinal screws, rods and artificial spinal discs (413,000), breast implants (366,000), heart pacemakers (235,567) and artificial hips (230,000). The data and information for each device are summarized in Table 1.
Table 1. Summary of Medical Implant Data
Implant Description |
Number
of
Procedures |
Total
Annual
Expenditure |
Average
Cost/
Procedure |
Major
Manufacturer(s) |
Artificial eye lenses |
2.582 million |
$8 - $10 billion |
$3,200 - $4,500 |
Alcon Laboratories/Novartis, Abbott Laboratories, Bausch & Lomb |
Ear tubes |
715,000 |
$1 - $2 billion |
$1,000 - $4,500 |
N/A |
Coronary stents |
560,000 |
$7.5 billion |
$13,000 |
Boston Scientific (46%), Abbott Laboratories |
Artificial knees |
543,000 |
$12 billion |
$22,000 |
Zimmer (24%), DePuy/J&J, Stryker, Biomet, Smith & Nephew |
Metal screws, pins, plates and rods |
453,000 |
$4.5 billion |
$2,000 - $20,000 |
Synthes (50%) |
IUDs (Intra-Uterine Devices) |
425,000 |
$340 million |
$800 |
Teva Pharmaceutical Industries and Bayer HealthCare |
Spine screws, rods and artificial discs |
413,000 |
$10 billion |
$25,000 |
Medtronic (35%) |
Breast Implants |
366,000 |
$992 million |
$3,351 |
Allergan, Mentor |
Heart pacemakers |
235,567 |
$4.5 billion |
$20,000 |
Medtronic (40%), St. Jude Medical, Boston Scientific |
Artificial hips |
230,000 |
$10.5 billion |
$45,000 |
Zimmer (24%), Stryker, DePuy/J&J, Biomet, Wright Medical |
Implantable cardioverter defibrillators |
133,262 |
$5.5 billion |
$40,000 |
Medtronic (40%), St. Jude Medical and Boston Scientific |
In the U.S.A., implants are considered to be medical devices and are regulated by the FDA under three classifications as defined in Title 21 CFR Part 860.3. The three classes (Class I, Class II and Class III) divide medical devices based on increasing risk to the user. Examples of each of the implant categories are discussed below. It is also noted that there are many ASTM and ISO standards that are applicable to medical implants, several of which are referenced herein.
The ideal implant material is described as having the following characteristics: 1) chemically inert; 2) excellent wear resistance; 3) superior biocompatibility; 4) an appropriate modulus of elasticity; 5) high strength; 6) long fatigue life; 7) corrosion-proof; and 8) inexpensive.
Orthopedic implants are used to alleviate problems with joints (e.g. hips, knees, fingers and toes, wrists and shoulders). They also are used to repair or treat bone fractures, scoliosis of the spine, osteoarthritis, spinal stenosis and pain.
Implants can fail for several reasons, including improper implantation, material defects, design defects, and/or manufacturing defects. The following sections provide an overview of the engineering and biomechanical challenges associated with implantable devices.
Orthopedic implants are used in fracture fixation through a process termed “open reduction – internal fixation” (i.e., ORIF). Most typically at present, these materials are metal alloys. The purpose of this surgical procedure is to enable the orthopedic surgeon to adequately stabilize the two ends of a fractured long bone or to bring many bone fragments from a comminuted fracture together in a stable fashion. For example, in some surgical procedures of the hand, an arthrodesis (bone fusion) is achieved by removing a proximal interphalangeal (PIP) joint and approximating the saw cut ends of the two bones together (proximal and middle phalanges) and securing them with a bone screw or dorsal finger surface metal plate over the proximal PIP joint at a desired arthrodesis PIP angle (see Case Study 1). In some spinal surgical procedures, metal plates are fixed to the anterior vertebral bodies in fusing functional spinal units in the cervical or lumbar spine; less frequently in the thoracic spine. Furthermore, in conjunction with hardware applied to anterior vertebral bodies, the posterior elements of vertebral structures may also be reinforced in a separate fusion procedure.
Spinal pathology such as scoliosis (lateral curvature{s}) may also be treated by hardware such as Harrington or Luque rods that enable the physician to apply an apparatus, which will apply tension on one side of the spine and compression on the other in an effort to correct the deformity. Currently, there are many different implants available for the treatment of scoliosis. Implant systems differ depending upon patient indications [4].
Current joint replacements are not only being used for hips and knees but also for interphalangeal joints, ankles, shoulders (glenohumeral (GH) joints) and other joints. These joint replacements may be in response to acute trauma, but are more commonly implanted in cases of remote trauma or advancing osteoarthritis, and/or chondromalacia with the advanced loss of joint articular cartilage. Whereas joint replacements in the past many times would fail within 5 to 10 years requiring revision, new knee and hip replacements may be expected to last 20 to 30 years. As implant materials and joint designs continue to improve, it is expected that the device life longevity will continue to increase.
Sports trauma
A 72-year-old male suffered a traumatic injury to his left hand while wrestling at age 16.
Evaluation and anatomical structures involved
At the time of the injury, his hand was evaluated by the wrestling coach and his family physician. Both the coach and family physician felt that he had “sprained” his left-hand middle finger. His pain decreased and he was able to use his hand for all functional activities, and continue forward with high school and university wrestling. Approximately 10 years following the injury, ulnar deviation of the middle phalanx of his left middle finger began to develop at the joint. The magnitude of the deformity started to accelerate when he was 66-years-old. At the age of 71, a “Swan Neck” deformity developed in addition to the ulnar deviation (Figure 1). This deformity progressed rapidly, prompting a consultation with an orthopedic hand surgeon. A “Swan Neck” deformity is characterized by hyperextension at the PIP joint and flexion at the distal interphalangeal joint (i.e., DIP). In addition to the ulnar deviation and “Swan Neck” deformity seen in the accompanying radiographs, there was a loss of joint space at the PIP joint and osteophyte development along the ulnar border of the PIP joint.
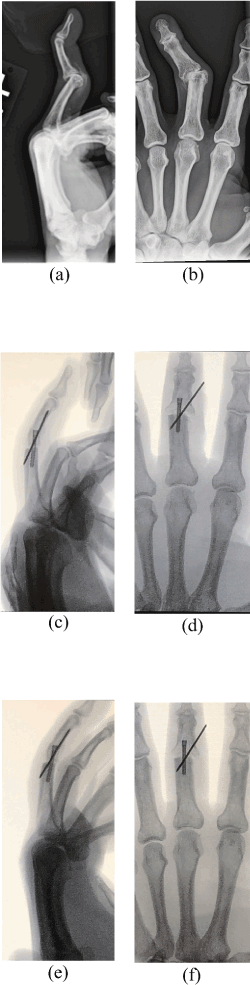
Figure 1. “Swan Neck” Deformity of the third Ray-PIP and DIP joints- Pre-op (a) Sagittal View radiograph, (b) Anteroposterior View radiograph, (c) Sagittal View, (d) Anteroposterior View; Fluoroscope Photo images of the same patient at 4 weeks post-op. Note woven bone has filled in the gap but remains to be fully mineralized which will require more time. The bone screw will remain in place, but the K wire will be pulled out when fusion of this proximal interphalangeal joint is more complete. Images (e) and (f) are of the same patient at 7 weeks post-op, showing better but still incomplete fusion. The K wire was pulled out after this imaging. (Courtesy of Patrick Hannon)
Likely cause of injuries
The ulnar deviation of the middle phalanx was likely caused by the original injury, which most likely involved a radial collateral ligament sprain of the PIP joint. This resulted in instability that allowed the extrinsic and intrinsic muscles of the middle finger (flexors, extensors, or both) to pull more toward the ulnar side of the hand, thus creating the ulnar deviation deformity. Over time, the moment arm for this ulnar pull increased, accelerating the deformity. A “Swan Neck” deformity is most commonly seen in individuals with rheumatoid arthritis, but in the present case, blood markers for this condition were negative. Rather, the swan neck deformity was the result of the instability at the PIP joint caused by changes in the volar plate, which allowed the middle phalanx to be pulled into hyperextension at the PIP joint by the extensor digitorum tendon of the middle finger. Without a functioning volar plate, the extrinsic finger flexor muscles (flexor digitorum profundus and flexor digitorum superficialis) were unable to counteract the pull from the opposing extensor digitorum. The osteoarthritis observed at the PIP joint is the consequence of abnormal intrinsic and extrinsic muscle forces being exerted on this joint without the necessary stabilizing structures needed to prevent the deformities, which led to further degeneration of the PIP joint cartilage surfaces. (Courtesy of Patrick Hannon)
“The improvement of bone fixation and joint replacement hardware has been an evolutionary process involving a team approach with biomechanists, physicians, and mechanical/material engineers. Biomaterials in orthopedics or dentistry require that the implant material be very resistant to repeated stresses and metals, ceramics, and some composites meet this requirement” [5]. For example, improvements in joint replacement polyethylene components have also become more durable with reduced penetration by incorporating highly cross-linked polyethylene into the articulating surfaces, leading to low friction durable components in moveable (i.e., diarthrodial) joints [6] and avoiding polyethylene debris (referred to as “poly” disease by some surgeons). The development of these hardware devices lies in complex factors and problems relating to: 1) biocompatibility 2) the use of modular components in joint replacements for an improved custom fit and 3) the failure of the bone fixation due to stress shielding of the underlying bone [5].
Fretting is a process of wear, sometimes including corrosion damage at the surface asperities (roughness) of contact between two or more load bearing implant surfaces that move relative to one another. The surface asperities of one surface act as an abrasive agent, wearing down the surface with which it is in contact. In joint replacements, the motion at the joint surfaces can be substantial. However, fracture fixation hardware can also result in fretting with relative micromotion between a metal plate or a long bone intramedullary rod in contact with bone tissue. Therefore, the quality of the surface layer can degrade with micropits and other forms of “roughness”. This can lead to reduced fatigue strength with fracture of the implant components.
Biocompatibility is an increased concern in diarthrodial joint replacements where fretting due to sliding/rolling motion shear stresses may also potentially contribute to an increase in the migration of metal ions into human tissues, as well as fatigue fracture of the implanted device over time. However, biocompatibility exacerbated by the fretting process is a genuine concern in bone fracture/defect fixation due to the possible toxicity of metal fracture fixation implant components. Metal implants exhibiting a degree of biological tissue toxicity such as cobalt-chromium alloys are still used in joint replacement implants because of their resistance to these shear stresses and less fretting [5]. Yet, cobalt-chromium alloys have been found to be toxic to surrounding biological tissues at high levels in a small number of patients (i.e., cobalt mean of 6.0 ng/ml and chromium mean of 0.6 ng/ml) when used in a cobalt-chromium alloy femoral neck stem joined to the modular femoral head of the implant at the acetabulum (i.e., hip socket) [7]. Metal alloys containing nickel or aluminum, although corrosion resistant and low in mass relative to volume, have been found to be toxic, and may result in inflammation of laminar bone and surrounding soft tissues. For example, an accumulation of aluminum, but not titanium, was found in soft tissues and newly formed bone lamella surrounding titanium plates affixed to human maxillae of the face with the use of Ti6Al4V titanium alloy bone screws (a titanium alloy with 6% aluminum and 4% vanadium) [8]. Furthermore, the titanium alloy Ti6Al4V (a.k.a. Ti-64) is in widespread use in orthopedic joint and bone fixation plate/rod implants and is very corrosion resistant, exhibits a high tensile strength (860 MPa) in addition to exhibiting high stiffness with a Young's modulus of 114-120 GPa [9,10]. However, vanadium, which is 4% of Ti-64, has also raised some concern in regard to its cytotoxicity and new alloys which substitute vanadium for a small percentage of iron (Ti-5Al-2.5FE) or niobium (Ti6Al-7Nb) address these concerns [9]. New strong titanium alloys with metals including molybdenum and niobium have been found to be non-toxic at levels of 8.5 and 172.0 microg/L respectively [11] The standard that governs these assessments is ASTM F 918 [12].
One concern of the physician is that stress shielding may take place with fracture fixation implants. Stress shielding results during fracture fixation when the inserted hardware absorbs the stresses that would normally be applied to the bone. In accord with Wolff’s law, stress shielding can lead to bone atrophy (becomes thinner) through bone resorption and a concomitant significant loss in bone strength. When the hardware is removed, the bone under a plate may be significantly weaker. Coupled with the bone micro-damage involved in pulling out pins and bone screws, and leaving a "stress raiser", bone will be more susceptible to re-fracture after these surgical explant procedures. Within weeks, in most cases, the bone will remodel sufficiently to become much stronger, and then re-fracture is much less likely.
Ti-64 alloy exhibits high stiffness which due to stress shielding can result in bone atrophy/degradation, resulting in a failed implant-bone tissue interface over time. New titanium alloys which may include iron (Fe), niobium (Nb), molybdenum (Mo) or tin (Sn), also act to reduce the stiffness of an orthopedic implant so as to more closely approximate the Young's Modulus of cortical bone (i.e., approximately 20 GPa). Titanium alloy implants incorporating such metals are less stiff with a Young's Modulus of 50-70 GPa, and therefore, more closely approximate the stiffness of the underlying cortical bone, enabling the fracture fixation implant to better transfer the loads of daily human activity to the bone [5]. In accordance with Wolff's law, this transfer of repeated significant loads to bone tissue results in maintaining the structural and functional integrity of both spongy and cortical (laminar) bone, and therefore better maintains the implant-bone interface over the longer term extending or eliminating the need for a surgical implant revision. Other factors such as the length of the long bone inserted stem in knee and hip (TKA/THA) joint replacements (i.e., affect upon stress shielding), or using cemented v. non-cemented components in joint replacements may affect the long-term outcome in specific patients. Biological individuality including factors such as gender, regional bone density/muscle density, age and general health can all affect the surgeon's choice of orthopedic hardware and method of fixation [6,13,14,15].
Joint replacements are increasingly being developed for new body regions and fracture fixation plating. Intramedullary rod fixation (long bones) has improved with changes in geometry and the implant material so as to reduce stress shielding. Plates and cages sometimes remain in the body over the human life span; some are removed at a later date and some implants are now biodegradable (over a predictable time period), eliminating the necessity of future removal [16].
The resistance to fatigue failure fractures and corrosion is one of many critical considerations in implant material selection. The more common orthopedic implant materials, such as commercially pure (CP) titanium, Ti-6Al-4V, and cobalt-chrome alloys, have demonstrated relatively low resistances to fatigue; particularly when the surfaces are not prepared properly and/or the surface has been mechanically damaged and/or the metal’s fatigue resistance has been reduced by excessive cold work (i.e., any metalworking process in which metal is shaped below its recrystallization temperature).
Also, these materials have all shown deleterious effects to surrounding tissue due to corrosion; particularly in the case of wear particles caused by components rubbing against each other. Corrosion of these materials has also been shown to continuously change the form (e.g., geometry, strength, composition) of the metals. Significant work has been done and is continuing in the area of corrosion and wear reduction, primarily in the form of various coatings like anodization and changes of the polymetric material in modular implant components. Despite the significant advancements in fatigue, corrosion and wear reduction, these challenges are likely to continue for the foreseeable future.
Many times, fractures require only a cast to restrict movement and sometimes only a sling (common clavicle fracture). In other cases, such as fractures of spinous or transverse processes of vertebrae or some rib fractures, nothing is done and healing progresses without complication. Furthermore, research findings indicate that the small amounts of motion produced by small forces may actually aid in healing, and therefore restriction of movement is contraindicated. This is the rationale for treating fractures that do not heal with ultrasound stimulation treatment. The micro-motion produced by the ultrasound appears to induce small electrical currents in bone (bone is an example of a piezo-electric material) and therefore promote healing. Alternatively, the small motions of displaced rib fractures in adults may significantly prolong the healing of a rib or ribs (i.e., costae). Therefore, displaced rib fractures in some adult patients are treated with ORIF, using inserted metal plates spanning the rib fracture site in order to minimize rib motion and promote more rapid healing and less pain.
Unstable fractures require external or internal fixation with multiple transcutaneous pins, screws, wires, plates, and rods. Good bone ends or bone fragment approximations are important for optimal healing (a satisfactory fracture reduction). A good blood supply is also very important and can be accomplished by preserving the soft tissue adjacent to the lesion site to ensure the continued blood supply to the outer and inner layers of bone periosteum. Bone screws alone may be sufficient to bring displaced bone fragments together and may be specifically designed for compact bone or for cancellous (spongy) bone (Figures 2 and 3).
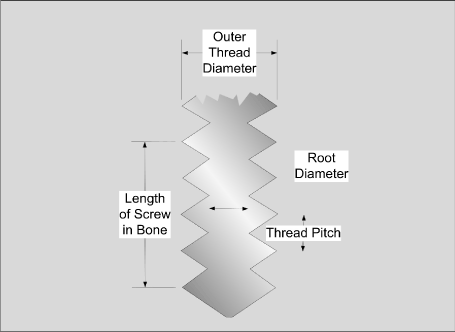
Figure 2. Screw parameters
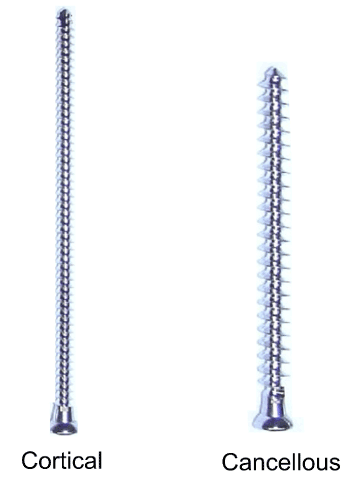
Figure 3. Types of bone screws. Bone screws may be made from stainless steel, titanium alloy, or cobalt-chromium alloy. The thread pitch is greater in cancellous bone screws, in similar fashion to “deck screws” used in carpentry. The holding capability of a bone screw is dependent upon the thread diameter times the thread length inside the bone (Kummer, 2001). Sometimes the screw holes are pre-tapped to minimize the micro-damage of screw insertion. The most important variable in screw fixation is the quality (density) of the compact (cortical) or cancellous bone. Those individuals with marked osteopena (lower bone density) are more likely to have screw loosening and inadequate fixation. Bone screwdrivers are also equipped with a force limiting mechanism (i.e., similar to a torque wrench) to prevent the stripping of bone caused by too much torque during screw insertion. (Kummer, 2001)
Sometimes metal plates are also attached by means of bone screws and are most critical on the side of the bone that is exposed to tension stresses as the result of bending loads, but may be applied to both sides of the bone for better fixation. These plates or rods are also made from similar metal alloys. These plates can also protect the bone during torsion loads and the shear, tension, and compression stresses. These same stresses are also applied to intramedullary devices (rods) inserted into the long bone intramedullary cavity. The hardware itself may also fail, and Kummer states that “sometimes there is a race between healing of the bone and fracture, usually by fatigue, of the device” [17] (Figure 4).
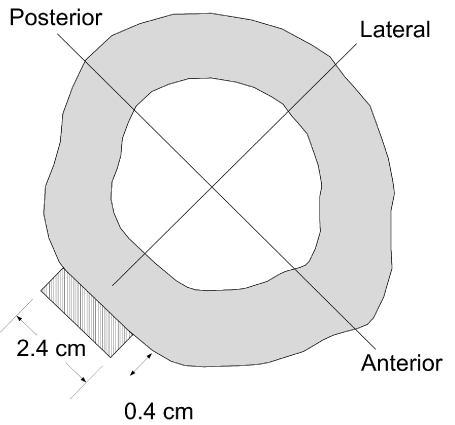
Figure 4. The “area moment of inertia” or “polar moment of inertial” (closed cylinder) may be increased with fracture fixation hardware. This example illustrates how a metal plate is much more rigid (resistant to bending) in anterior-posterior bending because of the increased height (2.4 cm3) of the metal plate
Hardware is also sometimes applied after an invasive surgical procedure which damages a bone. For example, the sternum may be bisected along its long axis by the cardiothoracic surgeon with a bone saw in order to expose the heart and pericardium as required for some procedures such as multi-artery bypass or some heart valve replacements. In closing reduction of the induced injury, sometimes metal plates (e.g., titanium) are fixated to the sternum body in addition to the placement of wrapped wire around the two halves of the sternum body. This procedure is said to provide increased stability of the sternum halves, less pain during recovery, and more rapid patient healing of the sternum (a primary source of pain post-surgery in open thorax procedures).
In some cases, internal hardware is designed to stay in permanently, while in other cases the hardware may be removed later after satisfactory bone reduction, fixation, and healing has occurred (Figure 4).
Engineers are confronted by many challenges when developing and testing implant devices. Some of challenges include mechanical design, geometry of the human anatomy, material corrosion and fatigue, friction and wear, manufacturing and biocompatibility.
For example, some surgeons prefer to use joint implant assembled (modular) components because they can better match the patient's anatomy and address several other factors. An example is a hip joint replacement where the surgeon would like to match the angle of the femoral neck to the femur long bone shaft of the contralateral non-surgical side, and/or correct for a discrepancy in left versus right lower extremity length. This custom fitting requires a wide range of modular components that can be assembled to provide correct alignment between the components. Additionally, a more acute angle at the implanted femoral neck-long shaft junction results in a longer moment arm for the hip abductor musculature, and therefore increased ft-lbs of moment for post-operative abduction strength in the patient [5].
Sometimes individual modular components will make use of different metal alloys because each alloy serves a different purpose in order to maximize bone fixation, resisting long bone re-fracture and reducing friction/adhesion characteristics of the moveable joint bearing in joint replacements. An example is when a surgeon during a total hip replacement uses a femoral shaft medullary canal stem of titanium alloy (Ti-64), a cobalt-chromium neck, and a ceramic or cobalt-chromium-molybdenum (CoCr-Mo) ball head (fitted into the hip socket) [18].
One problem with joint replacements making use of metal component systems is that the junctions between components may result in significant fretting over time, as discussed previously, due to the implant component micro movement with the consequent production of metal debris.
Additionally, galvanic corrosion is a challenge that has long been known to occur when dissimilar metals of screws, plates or rods come together in the presence of body tissue fluids (electrolytes) to form an electrical (galvanic) couple [5]. Many implants use dissimilar metals and the effects of mechanisms like galvanic corrosion have been well documented. It is noted that the presence of general corrosion and corrosion fatigue and their effects have also been well documented in the literature [19] Failure Analysis of Commercially [20] Environmental Effects [21] Failure analyses of surgical implants in Brazil.
Failure analysis can be defined as the process of collecting and analyzing data to resolve the root cause of failure often with the goal of determining corrective actions or liability.
Failure analysis may be conducted at the design stage, prototype stage and at the field use stage of a product life cycle. Failure analysis involves the understanding of how structures (e.g., hip implant components) must be designed, the properties of materials, how materials and structures fail, and the forces and energies involved in the failure mechanisms. The fundamentals and principles of failure analysis relate to the chemistry, physics, engineering and design of the failed structure.
Examinations, measurements and testing of the failed and new exemplar components and products are necessary in order to provide a foundation for the understanding of the underlying principles related to the design and the failure modes.
An appropriate protocol should be followed during the analysis and testing of the failed component; particularly in the case of failure analyses involved in litigation. The process should include a series of activities depending upon the context and conditions of the failure. Therefore, photographic and textural documentation of all failed components including mechanical damage, wear, fracture and related physical, chemical and structural conditions must be made, if possible, for the failed components. Also, similar technical information must be obtained from the manufacturer of the failed component. Scientific and engineering analyses of the failure mechanisms must be based upon accepted and verifiable testing methods.
In failure analysis, evaluation of the forces and energies involved in the failure mechanisms and their relationship to the physical evidence and reconstruction should be conducted. Comparisons to other improved structural designs and materials generally, but not always, should be made in order to determine alternative design or structures available, which would have most probably avoided failure. Case Study 2 presents an analysis of the relevant factors that were present, leading up to a knee implant failure.
The available technology (e.g., Scanning Electron Microscopes (SEM), Energy Dispersive X-ray Spectrograph (EDX), etc.) should be relied upon in addition to relevant technical reference and discovery documents, including testing and design documents available to evaluate the failed structure and for alternative comparisons. Often component and/or total system testing is used to ascertain the properties and performance of the components and alternative designs. In the case where an alternative design has been proposed, a cost-benefit and risk-benefit analyses for the alternative structures is often desirable.
Additionally, the expert should apply all applicable codes and standards. However, reliance on the relevant codes and standards must also stand the test of applicability and provide reliable procedures and scientifically valid results relative to the particular product behavior being evaluated. In some cases, the standards do not service the needs of the product and its reasonably foreseeable harmful conditions, and such standards should be challenged and criticized rather than blindly followed. This occurs often and is one of the challenges often encountered during technical investigations, primarily by plaintiffs’ counsel and experts.
Accident
The plaintiff in this matter indicated that she was a front seat passenger in a pickup truck with her feet propped up on the dash. She was asleep and her seatback was slightly reclined at the time of a minor rear end collision. She did not hear the collision but the “jar” she felt woke her up. The change in velocity determined by the accident reconstructionist was determined to be a maximum of 2.0 mph of forward vehicle movement. The drivers of both vehicles pulled off to the side of the road and exchanged insurance information. As the plaintiff was stepping out of the passenger side of the pickup truck with her left hand still holding on to her door, she indicated that her knee "gave way". She further indicated that when she put her right foot on the running board, her left foot stepped onto the ground and she started to collapse. A fall was avoided because she was holding onto the door handle with her left hand. She further indicated that she continued to stumble three times and then finally got her legs to where they would hold her up.
Evaluation and anatomical structures involved
The plaintiff's left knee had undergone a total knee replacement (TKR) 9 years previous to this minor rear collision. In the ensuing years since her left TKR, the plaintiff had remained very active. However, examination of her left knee after the accident indicated collateral ligament laxity in valgus and varus positions. Follow-up standard X-ray imaging indicated wear mechanisms of the TKR components. The imaging films revealed an “obvious varus malalignment” (a.k.a. misalignment) of the tibial component secondary to “subsidence” with a possible proximal medial tibia fracture. One orthopedic physician indicated "poly" disease within her left knee (fretting of her polyethylene tibial component). The plaintiff underwent a revision TKR some two years after the motor vehicle accident. The surgeon indicated that the major reason for the revision was the subsidence and malalignment of the tibial plateau component within the posteromedial joint compartment, which led to the general collateral and capsular ligament laxity of her left knee. Her active lifestyle combined with her body mass index (BMI) approaching 30.0 most likely primarily contributed to the “bone collapse-caving in" (subsidence) of the tibial component of her left total knee replacement (a.k.a. total knee arthroplasty).
Furthermore, the rear-end collision to the pickup truck was in the wrong direction and of insignificant magnitude so as to produce any meaningful loading to either of the plaintiff’s knees, regardless of her report of her feet being propped up on the truck dashboard while she was sleeping. After the collision event, the step from the truck’s running board to the ground below would have been similar to simply descending a staircase. Finally, some of her physical activities prior to the collision event that she discussed during her deposition testimony were calculated to have produced an estimated 7.6 times her body weight in joint reaction forces within the knee (tibiofemoral joint) much above taking one step down from the pickup truck. Therefore, a biomechanics injury causation analysis (ICA) indicated a mismatch between the rear-end motor vehicle collision or stepping out of the vehicle and the plaintiff’s left knee pathology. (Courtesy of Patrick Hannon).
The primary tools of failure analysis are the optical microscope (OM), scanning electron microscope (SEM), energy dispersive x-ray spectrograph (EDX), spark optical emission spectrograph (or spark OES), microhardness indentation tester and the various actions employed in and referred to as metallographic techniques and analysis.
The primary advantage of optical microscopy is that images of the “as found” sample surface topography and other features can be very quickly and easily obtained using low cost equipment (optical microscopy with appropriate lighting and image capture capability). No precleaning or other preparation is generally needed to obtain initial information when imaging failed medical implants.
Optical microscopy can also be used to evaluate the microstructure and determine grain and phase structure size in metallic samples that have been ground, polished and etched. Optical microscopy also is used to evaluate heat treatments, the integrity of welds, and to determine the effect(s) of processing on microstructure. Images are compared to the available analysis that provide micrographs/fractographs of sample surfaces that are identical to or very similar to (composition, processing, etc.) the sample being analyzed. It is noted that automated image analysis devices or analyzers are available for image analysis in some applications (grain size, shape, boundary area, etc.). For most analyses, the samples must be sectioned, ground, polished and etched before the desired information can be obtained using these methods. When the analysis is involved in litigation, these techniques are preceded by the creation of an agreed upon protocol of all parties due to the destructive nature of the employed methods and techniques.
The primary limitation of optical microscopy is that the images are very limited in depth of field and relatively limited in magnification. Also, resolution is limited to approximately 1 µm (approximately 0.0000394 inch or ~1/50th of the diameter of a human hair). It is noted that it has been the authors’ experience that the fatigue striations typically found on the fracture surfaces of failed orthopedic implants are generally identifiable using optical metallography, but definitive discovery requires the examination by a scanning electron microscope (SEM).
The primary strength of the scanning electron microscope (SEM) is the ability to create very high-resolution, high-magnification, high depth of field images of sample surfaces; images referred to as electron-micrographs, photomicrographs or simply micrographs. Magnifications of 1,000,000X are possible, although magnifications on the order of 10X to 5,000X are generally sufficient for sample surface and fracture surface analysis. For comparison, the maximum optical microscope magnification is approximately 1,000X under ideal conditions. Also, if magnifications greater than approximately 100,000X are required, a transmission electron microscope (TEM) or scanning transmission electron microscope (STEM) can be used more effectively than an SEM.
The SEM can be used to image features as small as 3 to 100 nm. If the SEM is equipped with a backscattered electron detector, it can be used to image grain boundaries and second phases on unetched samples and evaluation of crystallographic orientations. The SEM can be used to evaluate any solid or liquid sample material as long as the material vapor pressure is greater than approximately 10-3 torr.
In order to image low conductivity materials, it is often necessary to coat samples with a very thin layer of a conducting material such as gold or carbon. The thin layer of gold or carbon is sputtered (i.e., a technique for applying a molecular layer of atoms to a surface) onto the relevant surface within a vacuum chamber. The samples must be relatively clean and free from high vapor pressure liquids (e.g., oils, organics cleaning solutions, etc.).
One limitation of the typical SEM is that the samples must be placed in a relatively small vacuum chamber for analysis. The maximum sample size is on the order of two inches in the dimension that is perpendicular to the surface to be analyzed and four to six inches in any other dimension. SEMs with larger chambers are available, but the chamber sizes will not accept very large samples and the machines are not presently as readily available to the independent investigator. SEMs which operate at atmospheric pressure have also been developed (i.e., environmental SEM), but are not readily assessable by the independent investigator.
SEMs often include the capability to conduct qualitative (or semi-quantitative) compositional analysis or chemical composition of sample material. The EDS capability is created by adding the hardware necessary to analyze the x-rays emitted by samples when bombarded by an electron beam. Because different elements emit different x-ray energies, the hardware and software can determine which elements are present and semi-quantitatively determine the relative quantity of each element.
An advantage of SEM-EDS is that the required scan times are relatively short. However, the primary limitation of SEM-EDS is that the technique will not generally identify trace elements. Also, if the elements included in the sample have x-ray energies that overlap, the presence of one or more elements may not be apparent in the output spectra due to energy peak overlap(s). In short, the accuracy and repeatability of EDS is acceptable only for “first pass” elemental analysis in cases where more accuracy is not necessary. In these cases, the analyst is often only interested in determining if unexpected, relatively large quantities of elements (with significantly different x-ray energies) are present; for example, to determine if melted copper is present on the surface of steel that had been exposed to fire and electrical activity (i.e., arcing). EDS can also be used to identify relatively high levels of contaminates, if present. Note that EDS is also capable of accurately revealing an alloy composition where the output can be compared to the output from known alloy samples.
In the case where reliable quantitative (trace) elemental composition data is required, electron probe X-ray microanalysis (EPMA or microprobe) which includes multiple Wavelength Dispersive X-ray Spectrometry (WDS) detectors is used. The primary disadvantages of WDS relative to EDS is that the scan times are much longer and the equipment is significantly more expensive. The advantages of WDS include its ability to differentiate sulfur in the presence of lead or molybdenum, tungsten or tantalum in silicon, or nickel in titanium due to its superior peak resolving capability. Additionally, WDS can detect much lower concentration species (10-100 ppm) such as phosphorus or sulfur in metals, contaminants in metal catalysts, trace heavy metal contamination and performance-degrading impurities in high temperature alloys. WDS is also capable of detecting low atomic number elements in such investigations as the search for unacceptable contaminates/impurities in biomedical materials and has much better performance in detecting lighter elements such as boron, nitrogen, beryllium, oxygen and fluorine, which may result in degradation of material strength and/or fatigue resistance in the orthopedic implant materials.
Spark OES is generally used to identify the elements contained within a metal alloy sample, part of which has been vaporized using an electrical arc/spark. The advantage of spark OES is that the results are inexpensive, reliable, repeatable and quick to obtain.
Rockwell hardness
Rockwell hardness is used to determine the hardness of metal parts by applying a load to materials through either a tungsten-carbide ball or a diamond spheroconical indenter. The material surface and the seating surface must be properly prepared before testing.
Following appropriate surface preparation, a relatively light load is applied to the indenter placed on the material to be tested (usually 3 kg [~29.4 N] or 5 kg [~49 N]) in order to “zero” the testing machine. A heavy load (from 15 kg [~147 Newtons (N)] to 150 kg [~1,471 N]) is then applied, depending on the material and its strength, and held for a time. The downward travel distance after the application of the light load until the release of the heavy load is then recorded and used to calculate hardness.
Various Rockwell hardness test procedures can be followed depending upon the material and strength of the specimen. The common Rockwell variants include:
1) HRC – “Rockwell C” A 150 kg [~1,471 N] load is applied through a diamond indenter. This technique is most commonly used on steels that are through hardened to increase strength. Components that are typically tested with this method include fasteners, tooling, springs, axles, and bearings.
2) HR15N – “Rockwell 15N” A 15 kg [~147 N] load is applied to case hardened components treated to achieve a minimum effective case depth of 0.007 inches or a total case thickness of 0.012 inches. Other Rockwell based techniques (e.g., HR30N and HR45N) apply higher loads for incrementally higher minimum effective or total case thicknesses.
3) HRBW – “Rockwell B” This technique uses a tungsten carbide ball. It is commonly used for relatively ductile materials like austenitic stainless steels and annealed materials.
Rockwell hardness testing is administered by ASTM E-18 Standard Test Methods for Rockwell Hardness and Rockwell Superficial Hardness of Metallic Materials [22].
Brinell hardness
Relatively high loads are applied to parts via a tungsten carbide ball. Brinell tests measure the diameter of the indentation made by the ball. A 10mm ball with an applied load of 3,000 kg [~29,420 N] is common for Brinell testing. Brinell tests are ideal for castings and forgings that may have rough surfaces or exhibit some chemical variation. The hardness values derived from Brinell hardness testing provide a more representative average hardness of a component.
Brinell hardness testing is administered by ASTM E 10 Standard Test Method for Brinell Hardness of Metallic Materials [23].
Microhardness testing
Microhardness tests apply considerably lighter loads compared to other methods. Precisely cut diamonds are used for these tests. The small diamond indenter is used to measure hardness in small, localized regions of components. The diamond indenter creates a diamond shaped indentation in the sample. A microscope with a calibrated scale provides measurement of the indentation, which is translated into hardness numbers. Microhardness tests are generally applied to determine the case thickness on case-hardened components. There are types of microhardness testing that use different shaped diamond indenters referred to as Vickers and Knoop.
The standard for microhardness testing is ASTM E 384 Standard Test Method for Microindentation Hardness of Materials [24].
Fractography is the term used to describe the process of evaluating fracture surface topography. The macro and micro evaluation of fracture surface topography using optical and electron imaging techniques allows the analyst to determine the causes and/or basic mechanisms of fracture of the failed component(s).
Fractography is primarily employed in the determination of the prevailing fracture mode. There are three fracture modes that are typically focused on during the analysis of fracture surfaces. They are: 1) dimple rupture (i.e., overload), 2) fatigue, and 3) cleavage.
Dimple rupture describes the morphology that predominates a fracture surface that was created during the ductile overload of a material. The surface features associated with an overload failure are typically referred to as ductile dimples. The dimples are created by the process known as microvoid coalescence. When an excessive load is applied to the material, microvoids begin to develop within the material in areas of localized strain discontinuities such as second phase particles, grain boundaries, inclusions and dislocations. As the strain increases, the microvoids grow, begin to coalesce, and eventually form a fracture surface. This process is represented graphically in Figure 5 [25]. The surface features are often described as cuplike, as exhibited by the dimples shown in Figures 6a and 6b.
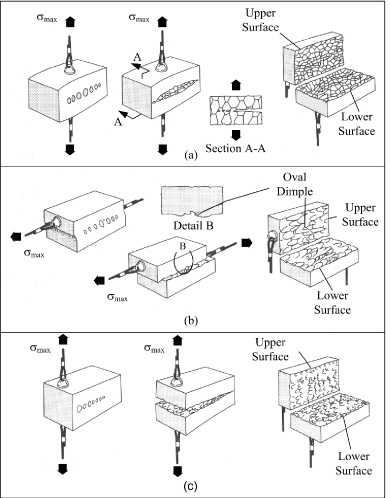
Figure 5. Process of Microvoid Development and Coalescence in Material Subjected to Maximum Stress (smax). (a) Equiaxed dimples formed by material under uniaxial tensile strain. (b) Elongated dimples formed by material subjected to shear strain. (c) Elongated dimples formed by material subjected to tensile tearing. (Adapted from ASM Metals Handbook, Vol. 12)
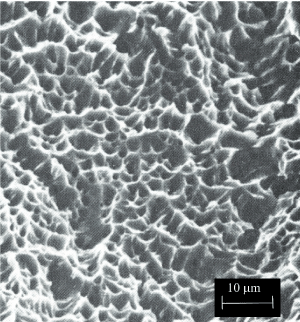
Figure 6a. Examples of Ductile Dimple Patterned Fracture Surface Deep dimples
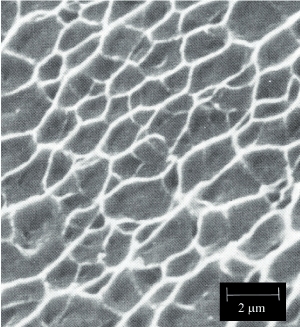
Figure 6b. Examples of Ductile Dimple Patterned Fracture Surface. Shallow dimples
The shape of the dimples can provide the analyst with information regarding to loading conditions to which the material was subjected. The three typical conditions are uniaxial tensile loading, shear loading and tensile tearing. The elongated dimples that result from shear and tensile tearing are shown graphically in Figure 5. Figures 6a and 6b shows examples of ductile dimples with different topography and at different magnifications.
These examples represent dimple shapes that are consistent with the stated strain conditions. Combinations of the listed strain conditions can result in dimple formations and shapes that can be difficult to properly interpret.
Fatigue is a process of progressive cyclic damage as a component is loaded repetitively at stress levels below the yield strength of the material. The fatigue process can be divided into three distinct stages: 1) crack initiation, 2) stable progressive crack propagation, and 3) fast final fracture [26].
Crack initiation typically begins at the location of a stress concentrator. Stress concentrators are inhomogeneities in the material or in its macroscopic geometry, such as second phase particles, voids, inclusions, notches, machining marks, surface damage or other surface flaws. It is important to note that fatigue crack initiation is often the life-limiting failure mechanism in the failure process. Discontinuities (e.g., machining marks, surface scratches, gouges or notches) created during the manufacture, installation or service can result in fatigue crack initiation under circumstances where an unflawed component would have had a satisfactory fatigue life [27].
In the second stage, stable progressive crack propagation, the crack advances a small distance every loading cycle, or several loading cycles, which enables the crack to advance. After one or more loading cycles, the crack advances a small distance and then arrests; this process leaves behind the characteristic markings on the fracture surface called fatigue striations (also referred to as crack arrest marks). After this process has been repeated many times, a fracture surface with numerous parallel lines is created.
In the final stage of the fatigue process, the cross section of the component that remains intact (i.e., not yet cracked) has been reduced to such a small area that the final load applied to the part is sufficient for a complete fast overload or cleavage fracture. This final area of the fracture surface will exhibit the features seen in monotonic, overload failures, such as tears and dimples in ductile materials. Thousands or even hundreds of thousands of stress cycles may occur between crack initiation and final fracture in metals.
Information about the type of loading an orthopedic implant was subjected to can also be determined by inspecting the fracture surface. Figure 7 (adapted from ASM Metals Handbook, Vol. 11, Fractography…) shows graphically that the lower the nominal stress that an implant component is subjected to, the smaller the fast fracture area will be and the larger the area covered with fatigue markings. If it can be established that the nominal stress upon the component was very low; the fast fracture area will be very small and the area that is covered with fatigue striations will comprise almost the entire fracture surface. Figure 8 shows an example of the surface features that are consistent with fatigue failure. The fatigue failure mode, its stages and its analysis are discussed in Case Study 3.
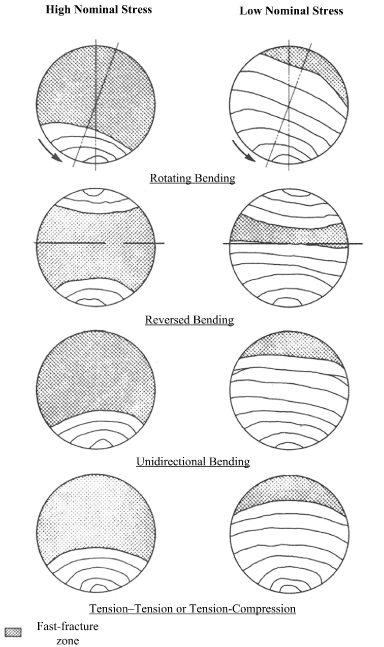
Figure 7. Fatigue Fracture Surface Feature Patterns Under Different Loading Conditions. (Adapted from ASM Handbook Vol. 11)
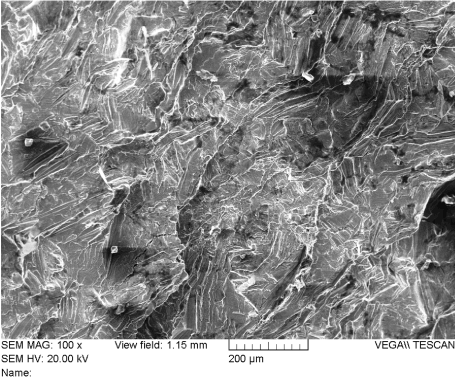
Figure 8. Example of Fatigue Fracture Surface Patterns on CP Titanium at Mag. = 1,000X
In addition to information about the loading conditions, counting striations may allow an estimate of the time to fracture failure [28].
Cleavage fracture is a low-energy mechanism that propagates along cleavage planes that are comprised of low-index crystallographic planes. Cleavage fractures have generally smooth surfaces at very high magnification. Cleavage fracture surfaces exhibit distinct topography such as river patterns, tongues, cleavage steps, chevron (herringbone) patterns, feather marks, and other features at lower magnifications, as shown in Figure 9. Brittle cleavage would be expected to produce a fairly smooth and planar fracture surface at the bulk material level.
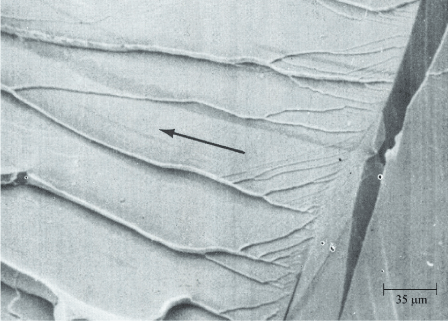
Figure 9. Example of Cleavage Fracture Surface Patterns. (Adapted from ASM Metals Handbook, Vol. 12)
It has been the experience of the authors that investigations of hip, knee and spinal support metal implant failures are the generally the result of surface damage created during manufacture, handling and/or surgeon implantation. The surface defects are the localized stress raisers and crack initiation locations. The crack(s) that develop in the implanted device eventually lead to fatigue crack propagation followed by fast fracture in the dimple rupture mode (or possibly cleavage) and final fracture.
Accident
The patient had two titanium spinal support rods surgically implanted. Approximately 18 months after the initial surgery, the patient was involved in a vehicle accident in which the vehicle he was driving was broadsided on the right (passenger) side by another vehicle. The patient’s vehicle also sideswiped a third vehicle before finally colliding with a telephone/light pole, reaching the point of rest.
Investigation
The patient’s post-accident medical treatment was completed. The patient sought no further medical treatments with regard to his back until approximately 19 months after the accident. Radiographic imaging at that time revealed that the spinal support rods were fractured. The rods were explanted.
After the hardware, including the spinal support rods were explanted, our goal was to determine when the rods failed and what failure mechanism was involved in order to investigate liability cause for the failure of the rods. Significant documentation was provided for review and analysis.
Figure 10 contains a radiograph of the rods after implantation, showing the positioning and condition of the supporting hardware. Examination of Figure 10 revealed that the spinal support rods and associated hardware were intact and that the attachment hardware was placed between the rods and all vertebrae adjacent to the rod except at the T11 vertebra. Therefore, the distance between vertebrae T10 and T12 hardware attachment points was more than double that of any other hardware separation distance along the length of the two rods. A rule of orthopedic mechanics states that the greater the distance between fixed supports, the greater the magnitude of stress and strain (bending deflection) a spinal support rod will experience between the rod support attachments.
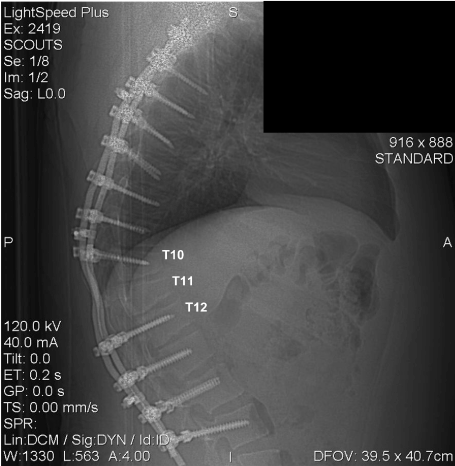
Figure 10. Radiograph of Relative Distances Between the Rod Attachment Hardware. (November 2005)
The location where the spinal support rods fractured in relation to the spine and attached hardware is shown in Figures 11 and 12, which are radiographs approximately 19 months after the accident. It can be seen that the rod fractures are located where the large gap existed between the fixation hardware as described.
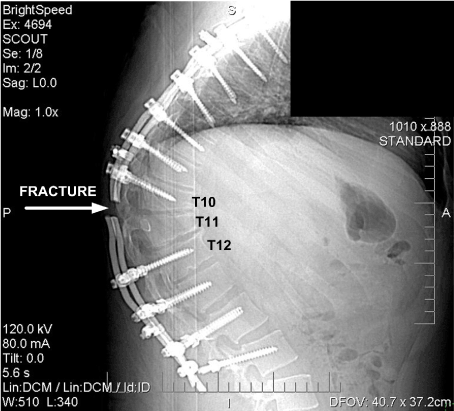
Figure 11. Radiograph of Fractured Rods, Rod Attachment Hardware and Spine. (November 2008)
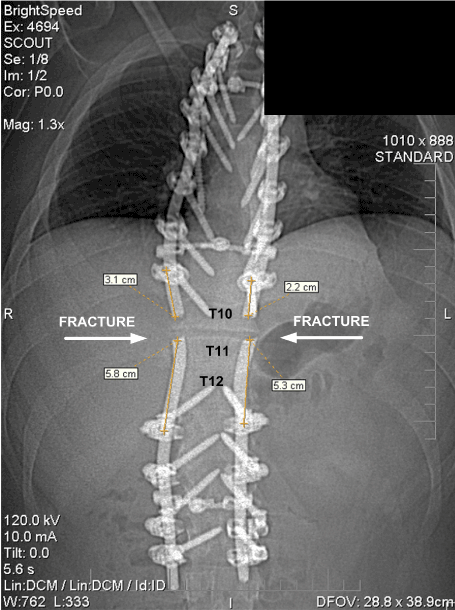
Figure 12. Radiograph of Fractured Rods, Rod Attachment Hardware and Spine (November 2008)
Interestingly, during the investigation, it was discovered that radiographs of the spinal support hardware created in six months before the vehicle accident showed clearly that the right spinal support rod was already fractured, as shown in Figures 13 and 14. The misalignment between the two fracture surfaces proved that one spinal support rod had fractured at some time six months before the accident. Figures 15 and 16 show lateral views of the spinal support rods. The figures clearly show that one rod was fractured and the other rod had a surface notch which would have been the expected fracture initiation site, which would lead to the eventual fracture of the second (left) rod. The fracture location and notch location were consistent with the fracture locations revealed by the November 2008 radiographs, as shown in Figures 11 and 12.
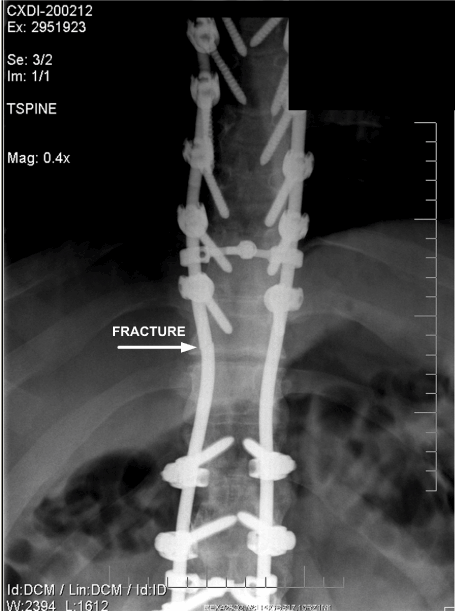
Figure 13. Anteroposterior View of Fractured Rod. (October 2006)
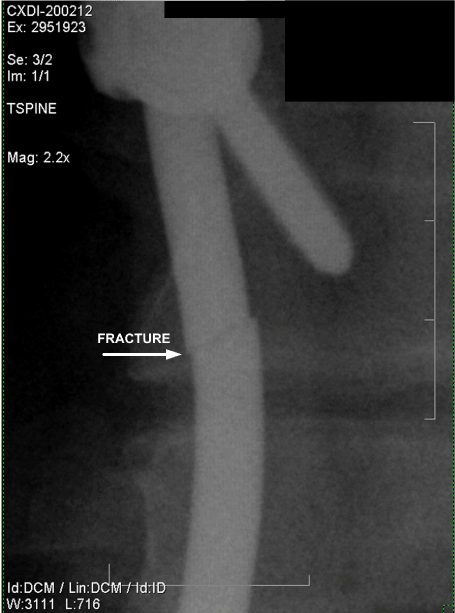
Figure 14. Anteroposterior Magnified View of Fractured Rod. (October 2006)
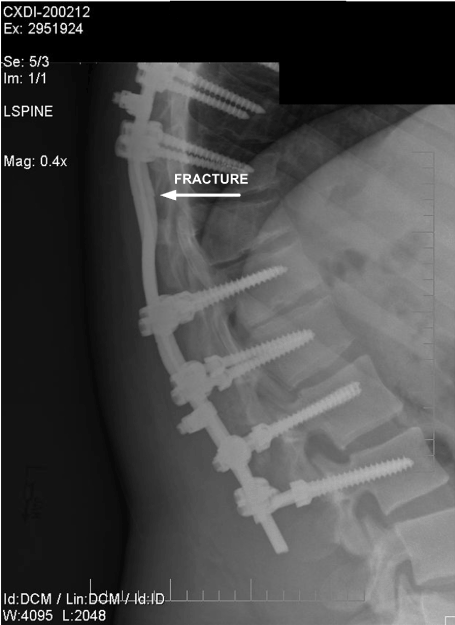
Figure 15. Lateral View of Fractured Rod. (October 2006)
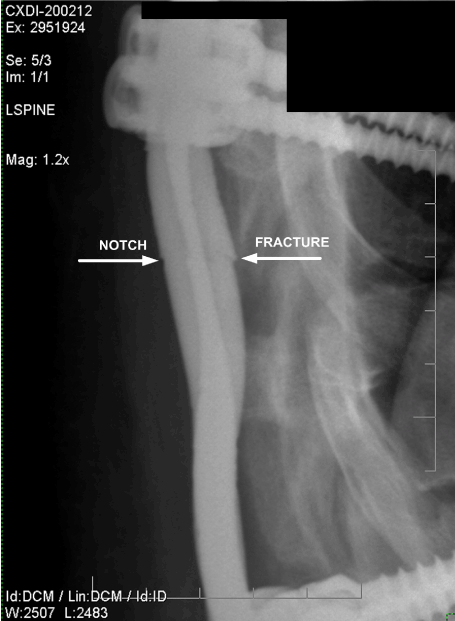
Figure 16. Lateral Magnified View of Fractured Rod. (October 2006)
Failure analysis
The explanted spinal support rods, as they were received, were labelled “A” and “B”, and are shown in Figures 17 and 18 respectively. Close views of the fracture areas for rods “A” and “B” are shown in Figures 19 and 20 respectively.

Figure 17. Explanted Rod “A”
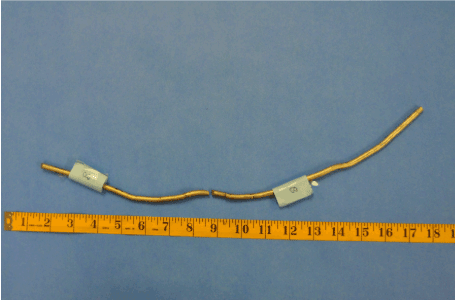
Figure 18. Explanted Rod “B”
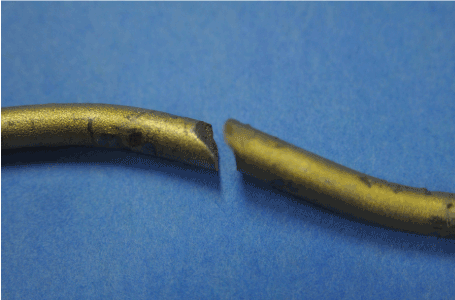
Figure 19. Close View of Fracture Area Rod “A”
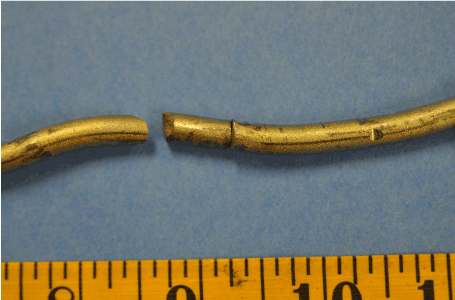
Figure 20. Close View of Fracture Area Rod “B”
It was readily observed that the surface of each rod had been shot peened. Shot peening is generally performed to introduce compressive stresses into the surface of the rods, which aids in the prevention of crack formation. This is typically done to parts where fatigue failure is a primary design concern, as was the case for these titanium rods [29].
Multiple notches in the rod surfaces were observed along the length of each rod. The notches had been created by the attachment hardware fasteners and the tools used by the surgeon to bend the rods to the desired shape. Notches in the surface of the rods served as stress concentrators and crack initiation sites. Not surprisingly, notches were observed at the fracture locations. Figures 21 and 22 show some of the notches in the surface of rod “B”.
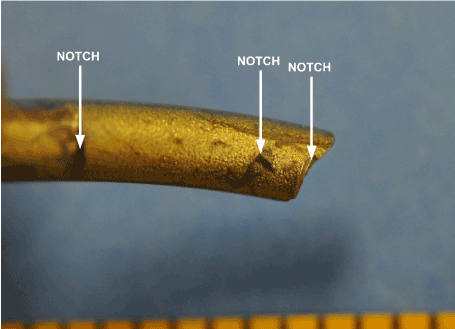
Figure 21. Rod “B” Surface Notches
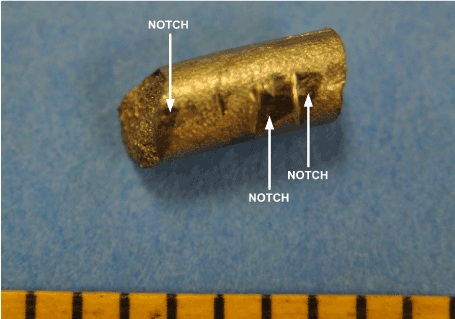
Figure 22. Rod “B” Surface Notches
The rods were initially straight. The surgeon had used special tools (e.g., French rod-bender) to bend the rods to the desired shape. The tools specified in the rod manufacturer’s documentation made notches on the rods consistent with those observed on our samples. Strain hardening of the rods occurred when they were bent. Strain hardening describes the increase in material strength induced, deliberately or accidentally, that occurs when a metal is subjected to plastic deformation. Strain hardening was detrimental in this case because it reduced the ductility and increased brittleness. The amount of work hardening would increase with the degree of bending as well as the number of times a location was repeatedly bent/straightened during the surgical procedure. In this case, the surgeon’s description of the procedure revealed that the rods were bent multiple times and to the maximum amount (minimum radius) by the surgeon to achieve his desired orthopedic outcome.
The spinal ductile metal support rods had multiple locations where surface damage was generated from contact with supporting hardware and the tools used to shape the rods. However, when the deep notches were cut into the surface by hardware and surgical tools, the protection that shot peening afforded was negated and sites that were susceptible to accelerated crack initiation were created.
The spinal support rod fracture surfaces were examined using scanning electron microscopy (SEM) and energy dispersive x-ray spectroscopy (EDX). Figure 23 shows an electron-micrograph of the fracture surface of rod “A” at 12X magnification. The surface was examined using higher magnification at several locations. It was determined that the great majority of the surface was covered with fatigue striations as shown in Figures 24-27. Ductile dimples could also be seen in a small portion of the final fracture surface near the fracture surface edge, as shown in Figure 28.
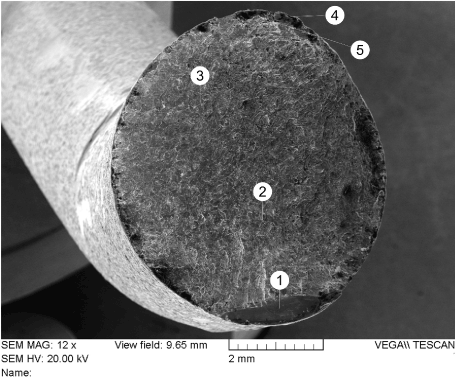
Figure 23. Image of Fracture Surface of Rod “A”. Numbers 1 through 5 Correspond to Location of Images Shown in Figures 24 through 28 respectively
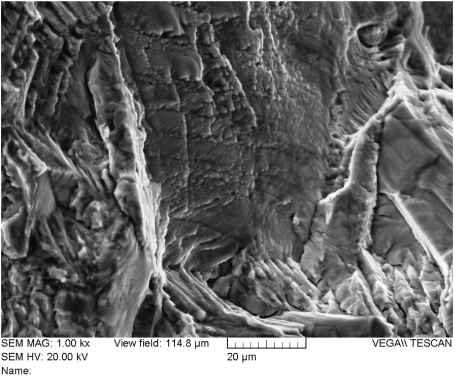
Figure 24. Fatigue Striations on the Fracture Surface of Rod “A” (Location 1)
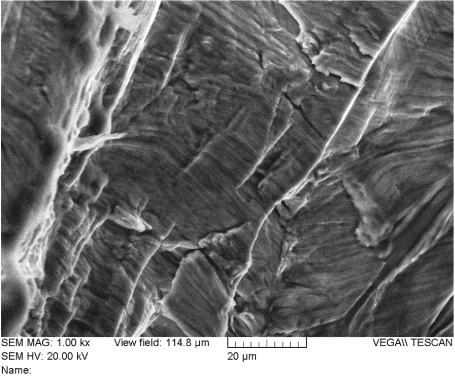
Figure 25. Fatigue Striations on the Fracture Surface of Rod “A” (Location 2)
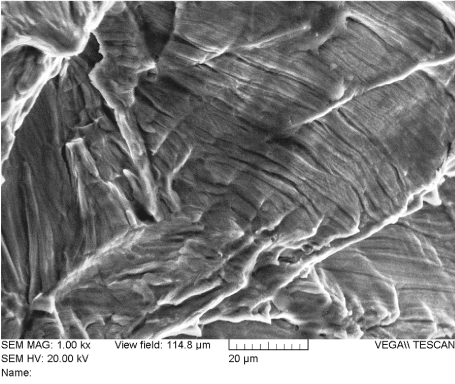
Figure 26. Fatigue Striations on the Fracture Surface of Rod “A” (Location 3)
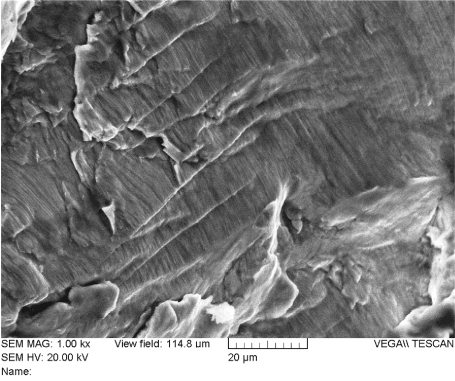
Figure 27. Fatigue Striations on the Fracture Surface of Rod “A” (Location 4)
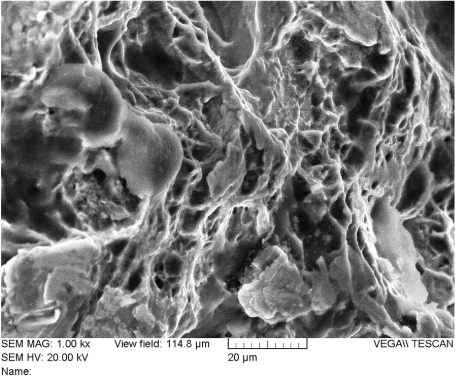
Figure 28. Ductile Dimples on the Outer Edge of the Fracture Surface of Rod “A” (Location 5)
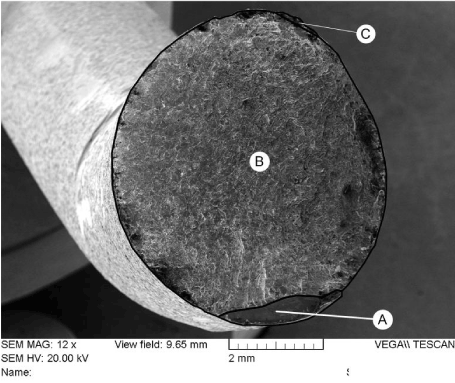
Figure 29 provides a summary of the features found on the fracture surface of rod “A”. The area annotated as “A” was a notch created by contact with a tool (likely a French rod-bender). The physical evidence indicates this was the origin of the fatigue crack. The area annotated as “B” is fatigue. Fatigue striations can be seen clearly when viewed at magnifications of 200X or higher. As fatigue occurred, the crack slowly progressed across area “B” over time as it advanced from the origin area “A”, to the final fracture area, annotated as area “C”. At the final fracture area, ductile dimples can be seen at magnifications of 250X or more. This was the last area of intact material when the final loading cycle took place and rod “A” fractured into two pieces.
Figure 29. Summary of Rod “A” Fracture Surface Features. Area A – crack initiation; Area B – crack propagation by fatigue; Area C – final failure in overload
Electron dispersive X-ray spectroscopy (EDS) revealed that the only absorbance bands detected in any appreciable quantity were those corresponding to titanium as shown in Figure 30. This finding confirmed that rod “A” and rod “B” were commercially pure (CP) titanium.
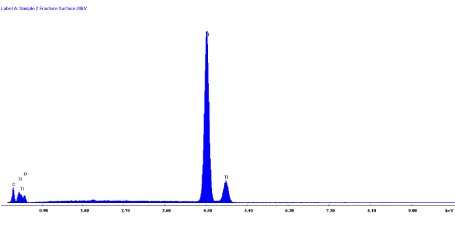
Figure 30. EDX Spectra for Rods “A” and “B”
Thousands of striations were present on the fracture surface of the rods, indicating that the failure occurred over at least thousands of cycles of loading and unloading. Note that the striations on the rod fracture surfaces shown in Figure 31 (adapted from ASM Metals Handbook, Vol. 12) and 32 [30] for CP titanium match the striations shown in Figures 24-27.
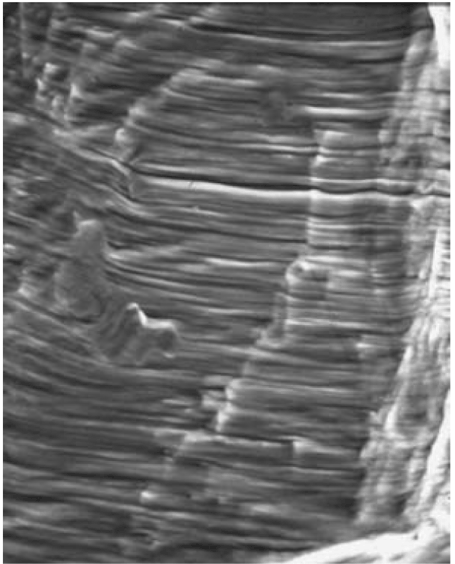
Figure 31. Fatigue Striations on the Fracture Surface of a Commercially Pure Titanium Specimen at Mag. = 1,000X. (Adapted from ASM Metals Handbook, Volume 12)
Failure analysis and fractography revealed that the failure cause (surface damage) and mechanism (fatigue) for rod “B” was essentially identical to that of rod “A”. The fracture surfaces curve from a plane perpendicular to the rod at the origin to an angle at the fast fracture zone. This type of behavior is more typical of a fatigue fracture, where the direction of stress would change slightly as the cracks propagated Figure 32.
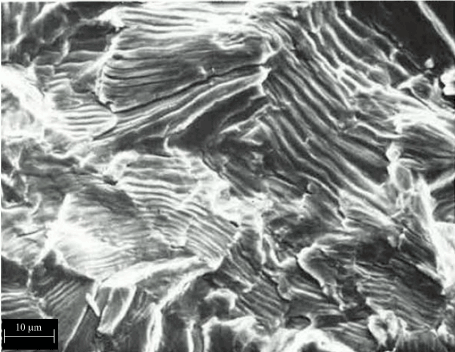
Figure 32. Fatigue Striations on the Fracture Surface of a Commercially Pure Titanium Specimen at Mag. = 5,000X. (Adapted from Biomedical Materials, Narayan, 2009)
Examination of the relevant documents, along with examination and testing of the physical evidence, revealed that the subject rods failed over time by fatigue crack growth due to stress magnitudes consistent with those expected from the walking ambulation and the normal every day activity of the patient. The fracture surface features were not consistent with a single impact overload failure. In other words, the motor vehicle accident in which the patient was involved was not the root cause of the failure of the back support rods. There was no evidence of cleavage-related failure mechanisms.
The notches in the surfaces of both rods were found to be the origins of the fatigue cracks that ultimately led to the failure of the rods. This is not surprising, given that the effect of subjecting both CP titanium and Ti-6Al-4V rods to contouring with a French rod-bender has been shown to significantly reduce the fatigue life of titanium spinal constructs [31]. Also, given that the notch sensitivity of CP titanium and its alloys has been known [29] and well documented. It is also noted that the effects of the in vivo environment also decreased the fatigue life of titanium and its reasonably biocompatible alloys [32], although these effects were not investigated in this litigated subject case.
During the period when the cracks were propagating, the surfaces would tend to open and close from the bending. This likely caused the observed contact marks between the crack/fracture surfaces of rod “B”. The contact marks suggested that rod “B” may have fractured first. Such markings were found mostly along the rod edges of the fracture surfaces. The low relative loading forces on the rods during crack growth did not lead to any significant fracture surface damage. After both rods fractured, a significant separation distance was generated, thus ending any fracture surface contact along each rod.
One of the two rods most likely fractured first, due to differences in loading conditions and notch severity between rod “A” and rod “B”. After the first rod fractured, the load on the second rod increased significantly as the portion of the load that was being carried by the first rod would was then applied to and sustained by the remaining intact rod [33].
The use of implantable devices to treat various medical pathology is likely to grow significantly in the coming years. The technology will continue to evolve and the number of types of implantable devices will increase with time. Because some fraction of these devices will inevitably fail, it is expected that failure analysis tools and techniques will also grow and evolve. The future for both implantable medical devices and those involved in science and engineering activities associated with the various technologies will present significant challenges and opportunities that will greatly improve the quality of life for millions of people
- McCloy J (2016) Medical Implants: The cost of failure. advanced manufacturing.
- Top Markets Report (2016) – Medical Devices. U. S. Department of Commerce, International Trade Administration.
- McIntyre DA (2011) The eleven most implanted medical devices in America. Business Insider.
- Mohaideen A, Nagarkatti D, Banta J, Foley C (2000) Not all rods are harrington - An overview of spinal instrumentation in scoliosis treatment. Pediatric Radiology 30: 110-118.
- Hannon P (2016) A brief review of current orthopedic implant device issues: Biomechanics and Biocompatibility. Biology Medicine and Engineering 1: 1-2.
- Digas G (2005) New Polymer Materials in Total Hip Arthroplasty: Evaluation with Radiostereometry, Bone Desitometry, Radiography and Clinical Parameters. Acta Orthopaedica Supplementum 76: 4-82.
- Cooper HJ, Urban RM, Wixson RL, Meneghini M, Jacobs JJ (2013) Adverse local tissue reaction arising from corrosion at the femoral neck-body junction in dual-taper stem with a cobalt-chromium modular neck. The Journal of Bone and Joint Surgery 95: 865-872. [Crossref]
- Zaffe D, Bertoldi C, Consolo U (2004) Accumulation of aluminum in lamellar bone after implantation of titanium plates, Ti-6AL-4V Screws. Hydroxyapatite Granules. Biomaterials 25: 3837-3844. [Crossref]
- Sidambe AT (2014) Biocompatibility of advanced manufactured titanium implants - A review. Materials 7: 8168-8188. [Crossref]
- Tanaka H, Mori Y, Noro A, Kogure A, Kamimura M, et al. (2016) Apatite formation and biocompatibility of a low young’s modulus ti-nb-sn alloy treated with anodic oxidation and hot water. Public Library of Science One 11. [Crossref]
- Li Y, Wong C, Xiong J, Hodgson P, Wen C (2010) Cytotoxicity of titanium and titanium alloying elements. J Dental Research 89: 493-497.
- ASTM International (1992) ASTM F 981-92: Standard practice for assessment of compatibility of biomaterials for surgical implants with respect to effect of materials on muscle and bone. American society for testing and materials. 5: 312-315.
- Gargiulo P, Pétursson T, Magnússon B, Bifulco P (2013) Assessment of total hip arthroplasty by means of computed tomography 3D models and fracture risk evaluation. Artificial Organs 37: 567-73.
- Gargiulo P, Helgason T, Ramon C, Jónsson H Jr, Carraro U (2014) CT and MRI assessment and characterization using segmentation and 3D modeling techniques: Applications to Muscle, Bone and Brain. European Journal of Translational Myology 24: 3298.
- Pétursson Þ, Edmunds KJ, Gíslason MK, Magnússon B (2015) Bone mineral density and fracture risk assessment to optimize prosthesis selection in total hip replacement. Computational Mathematical Methods in Medicine 2015: 162481.
- Park H, Temenoff JS, Mikos AG (2007) Biodegradable orthopedic implants. In: Bronner, F., Farach-Carson, M. C., Mikos, A. G. (eds) Engineering of Functional Skeletal Tissues. Topics in Bone Biology, vol. 3, 55-68. Springer, London.
- Kummer FJ (200). Introduction to the biomechanics of fracture fixation. Basic Biomechanics of the Musculoskeletal System 4: 390-398.
- Krishnan H, Krishnan S, Blunn G, Skinner J, Hart A (2013) Instructional Review: Hip modular neck femoral stems. The Bone and Joint Journal 95: 1011-1021.
- Azevedo CRF (2002) Failure analysis of a commercially pure titanium plate for osteosynthesis. Engineering Failure Analysis 10: 153-164.
- Azevedo CRF, dos Santos AP (2003) Environmental effects during fatigue testing: Fractographic observation of commercially pure titanium plate for cranio-facial fixation. International Journal of Fatigue 10: 431-442.
- Azevedo CRF, Hippert Jr. E (2002) Failure analyses of surgical implants in brazil. Engineering Failure Analysis 9: 621-631.
- ASTM International (2000) ASTM E 18-00: Standard test methods for rockwell hardness and rockwell superficial hardness of metallic materials. American Society for Testing and Materials.
- ASTM International (2001) ASTM E 10-01: Standard test method for brinell hardness of metallic materials. American Society for Testing and Materials.
- ASTM International (1989) ASTM F 384-89: Standard test methods for microhardness of materials. American Society for Testing and Materials. 385-402.
- ASM International (1987) Fractography. ASM International Handbook, 9th Ed., Vol. 12, pp. 14, 20, 61, 177 & 441.
- Das AK (1996) Failure: types and characteristics. Metallurgy of Failure Analysis. 69-76.
- ASM International (1987) Failure analysis and prevention. ASM International Handbook, 9th Ed., Vol. 11.
- DeVries PH, Ruth KT, Dennies DP (2010) Counting on Fatigue: Striations and their measure. Journal of Failure Analysis and Prevention 10: 120-137.
- Dick JC, Bourgeault CA (2001) Notch sensitivity of titanium alloy, Commercially pure titanium, and stainless steel spinal implants. SPINE 26: 1668-1672.
- Narayan R, Pilliar RM (2009) Metallic biomaterials. Biomedical Materials 6: 52-53.
- Lindsey C, Deviren V, Xu Z, Yeh RF, Puttlitz CM (2006) The effects of rod contorting of spinal contract fatigue strength. SPINE 31: 1680-1687.
- Rodrigues DC, Urban RM, Jacobs JJ, Gilbert JL (2009). In Vivo severe corrosion and hydrogen embrittlement of retrieved modular body titanium hip-implants. Journal of Biomedical Materials Research 88: 206-219. [Crossref]
- Bosch, Anderson and Hannon (2020) Ch 21, in Hannon, Cornwall and Knapp, Forensic Biomechanics, Lawyers and Judges Pub, Tucson, Arizona.