Introduction
Traumatic injuries in children are a common problem with the upper central incisor as the most affected tooth [1,2]. Frequently, traumatized teeth show pulp necrosis [3]. In case of an immature tooth, that will lead to an interruption of the root development leaving wide-open the apex and fragile dentinal walls that are difficult to manage with conventional endodontic treatments [3]. In addition, this pulpal degeneration can lead to the remaining of debris and endodontic material in the pulp chamber which will cause tooth discoloration [4].
The purpose of this report is to describe the global management of a coronal complicated fracture of a maxillary permanent central incisor # 21 with pulp necrosis, apical periodontitis within an open apex and crown discoloration.
To overcome the limitations of traditional long term calcium hydroxide apexification procedures, nonsurgical one step apexification using an array of materials such as mineral trioxide aggregate (MTA) has been suggested.The endodontic treatment was followed then with an internal bleaching. Finally, a composite resin stratification with layering technique was done.
Case report
A 15-year-old female was referred by pediatric dental department to the department of Restorative Dentistry and Endodontics. Her main complaint was pain related to tooth #21 as well as esthetic problem. The dental history revealed a trauma to the anterior maxillary region 6 years ago.
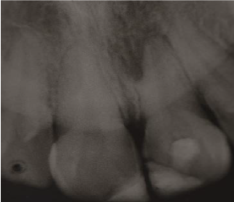
Clinical examination (figure 1a) revealed defective resin composite restoration on teeth #21 and #11. Tooth#21 showed an access cavity already done, with a clear discoloration. Sensitivity tests showed positive response only on tooth #11. The tooth #21 was tender to percussion with a physiological mobility. The periodontal state was unhealthy. The gingiva was inflamed with plaque and calculus on teeth. Periapical radiographic examination (figure 1b) showed an immature open apex of the tooth #21 with a radiolucent lesion in the apical area.
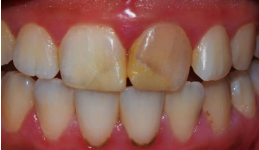
Figure 1a. Initial clinical view of the anterior maxillary region: observe the defective restorations of teeth 11 and 21 with discoloration on tooth 21.
The diagnosis established was a chronic apical periodontitis with an open apex. Our treatment plan included an endodontic management followed by an internal bleaching, then restoration of the incisors with stratification layering technique using Composite Resin.
First of all, the patient was given instructions about the correct way to remove dental plaque.
The first step of the endodontic treatment was the apexification of tooth #21. It is a nonsurgical method of inducing a calcific barrier at an open root apex of non-vital teeth to prevent the extrusion of filling materials and creating a suitable environment for periapical tissues repair [3, 5, 6].
For this purpose, we used Mineral trioxide aggregate or MTA.
The endodontic treatment started with the isolation of the tooth with a rubber dam. The working length (WL) was easily determined using a file in place radiograph, as the canal was too large. The canal was then cleaned and shaped using rotary Protaper (Densplay, Maillfer) under NaOCl 2.5% (Niclor OGNA) irrigation. As final irrigation, we chose 5ml of 5% NaOCl then 2 ml of 17% EDTA, to complete with 2 ml of 0.2% Chlorhexidine. Each time, we neutralized with sterile water to prevent interaction between the different solutions. After drying the canal, calcium hydroxide (Ultracalxs, Ultradent) was placed as intracanal medicament using an intracanal capillary point (C Tips, Ultradent).
The calcium hydroxide was removed after two weeks to assure the root disinfection. The canal was dried with sterile paper point.
To fit the MTA in the apical portion, 2 Machtou pluggers number 2 and number 4 were chosen (silicone stop must be at WL – 2mm and at Working Length(WL) – 4 or 5mm respectively with a slight contact with root walls). The powder of MTA (Dental Tulsa Dentsply) was mixed with sterile water (figure 2a) following the manufacturer’s instruction.Then, the mixture was carried into the canal using an amalgam carrier and genteelly condensed apically to create an apical plug of 4-5 mm of thickness. To check the correct position of the MTA mixture, an X-ray control was done immediately (figure 2b). A wet cotton pellet with sterile water was then placed in the pulp chamber and the access cavity was temporary sealed with IRM (Caulk/Dentsply, Milford, DE, USA). Two weeks later, the tooth was asymptomatic, so the rest of the canal was obturated with thermoplasticized gutta-percha (Revo®condenser, MicroMega). The final result of the obturation can be seen in figure 2c.
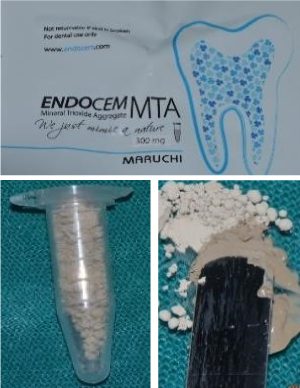
Figure 2a. MTA mixed with sterile water following the manufacturer’s instructions
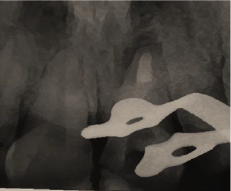
Figure 2b. Immediate postoperative periapical radiograph
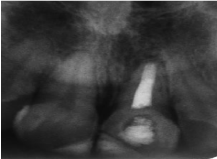
Figure 2c. Postoperative periapical radiograph of the canal obturation
Once the endodontic therapy was validated and the adequacy of the canal obturation was confirmed, the internal bleaching of tooth #21could began.
The barrier probing was recorded using a rubber stop to identify the labial depth (figure 3a) then transferred into the pulp chamber of tooth #21, to create an outline for the internal barrier on 2 mm to the cement enamel junction (figure 3b).
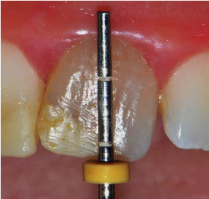
Figure 3a. record barrier probing using a rubber stop to identify the labial depth
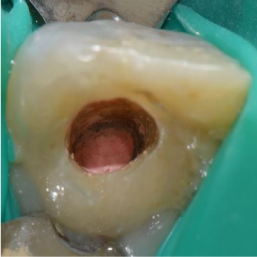
Figure 3b. Management of the outline for the internal barrier
Light cured calcium hydroxide was placed as a barrier material (figure 3c) then polymerized for 20 seconds, so we could place the bleaching material (opalescence endo 37%) with application on the buccal and cervical walls. A small cotton covered the bleaching material and the access cavity was sealed with temporary filling material IRM (Caulk/Dentsply, Milford, DE, USA).
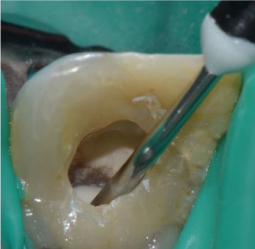
Figure 3c. Placement of the barrier material (light cured calcium hydroxide)
The bleaching material was changed regularly every 3 days for 3 times (without forgetting photographs of the bleached tooth) until we had over bleaching comparing to the tooth #11.
Neutralization with calcium hydroxide was necessary. On one hand, it will avoid internal resorption.On the other hand, the bleaching agent can inhibit the composite resin polymerisation. This step lasted for 10 days, then we put the patient under control of the new shade of tooth #21 for 3 weeks to obtain a color stabilization.
After planning the restorative treatment, a silicone guide was fabricated from the wax-up cast model then intraorally tested (figure 4a). The color selection must be prior to rubber dam isolation because tooth dehydration may mislead the choice of the shade (figure 4b).
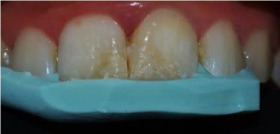
Figure 4a. Intraoral test of the silicone guide
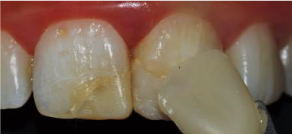
Figure 4b. Color selection
After rubber dam isolation and removing of the old restorations, a concave bevel was made on the enamel of the fracture area with the aid of a flame-shape Diamond bur (figure 4c).
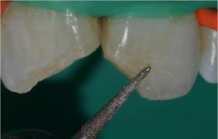
Figure 4c. concave bevel on the enamel of the fracture area
A 37% phosphoric acid gel was applied for 10 seconds over the enamel (figure 5a) then over the entire tooth for 20 other seconds. Then, the tooth was washed with an air–water spray. The entire tooth surface was air-dried and the exposed dentin surfaces were re-wetted with a disposable brush (Cavibrush, FGM Dental Products).
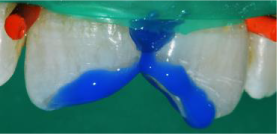
Figure 5a. Application of 37 % phosphoric acid gel over the enamel
Afterward, the adhesive system Adper Single Bond 2 (3M ESPE, St. Paul, MN, USA) was applied in two coats following the manufacturer’s guidelines (figure 5b).
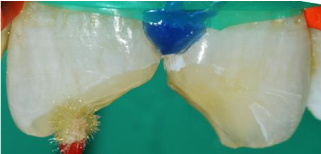
Figure 5b. Application of the adhesive system Adper Single Bond 2
The level of the fracture was marked on the silicone guide using a probe (figure 6a). With a filling spatula, a small ball of translucent enamel microhybrid composite (T-Neutral shade, Opallis, FGM Dental Products) was placed on the silicone guide and spread over the silicone guide surface (figure 6b), as this layer of composite was aimed to cover all the exposed dentin at the palatal surface. Care was taken to avoid the insertion of large air bubbles and also the application of an excessively thick layer of resin. Subsequently, the silicone guide was placed into position, and the first resin layer was polymerized for approximately 20 seconds with the same light-curing unit described earlier.
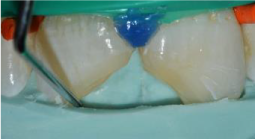
Figure 6a. Mark of the level fracture on the silicone guide using a probe
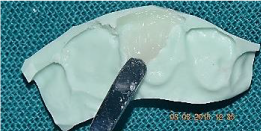
Figure 6b. A thin layer of translucent micro hybrid composite resin inserted on the guide
Then, the silicone guide was cautiously removed.
The palatal wall obtained (figure 6c) was used as support for stratification of composite resin by layering technique using dentin and enamel shades. Each layer was photopolimerized for 20 seconds. An initial finishing was started using diamond bur to rough up the resin surface. A final light curing time lasted 40 seconds. The rubber dam was removed and the occlusion was verified using articulating paper.
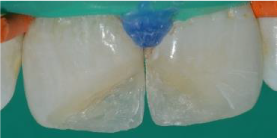
Figure 6c. Confection of the artificial palatal layer with enamel shade composite resin
Forty eight hours later, the patient returned to complete the finishing of surface. The surface texture was tapered with a fine diamond bur (figure 7a). Silicone abrasive cups and abrasive brush (figure 7b,7c) were used to eliminate undesired excessive texture. The interproximal regions were polished with abrasive strips.
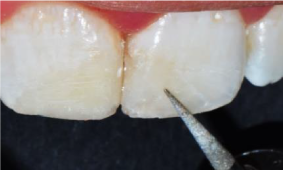
Figure 7a. The surface texture was re-created with a tapered fine diamond bur
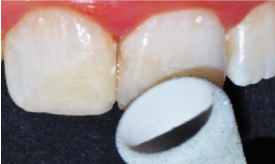
Figure 7b. Finishing of surface with silicone abrasive cups
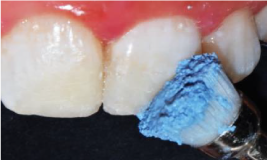
Figure 7c. Polishing with abrasive brush
A smile photograph of the patient was taken as shown in figure 8.
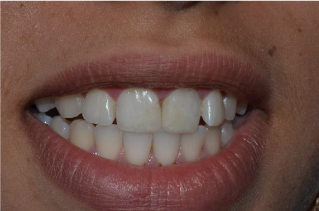
Figure 8. Postoperative photograph of the patient’s smile
Discussion
Traumatic injuries on immature teeth leading to the loss of pulp viability make the endodontic treatment challenging [3]. The most important problem in the classic apical periodontitis with an open apex is the poor determination of a good apical stop, lack of sealing and the risk of overfilling [7]. Different materials have being proposed for the apical plug formation. For many decays, calcium hydroxide was the most used material for that purpose thanks to his high rates of achievement in inducing a calcified apical barrier [8]. But despite its success, technical apexification with this material has many disadvantages [8]. Essentially, it is a time requiring material i.e multiple patient visits are necessary for the treatment (variable treatment time ranging from 5 months to 20 months). This can lead to a high risk of reinfection due to the microinfiltration throw the temporary coronal seal [9]. In addition, the canal may be susceptible to fracture [5,9]. In their study, Bonte et al found that four of 15 teeth in the calcium hydroxide group developed root fractures compared with none in the MTA group [10]. Besides, appointment multiplication generates a poor patient compliance with follow-up explaining the clinical and radiographic failures. To avoid all those drawbacks, MTA was chosen as the one step material of apexification. MTA appeared to show good sealing ability. It can also be used in the presence of canal moisture [9]. This biocompatible material, besides being used to create a physical barrier, it also helps in the formation of bone and periodontium around its interface [11].
In addition, MTA showed antibacterial proprieties thanks to his alkaline pH similar to calcium hydroxide. That is why Nicoloso GF et al. mentioned in their report that MTA can be applied on the canal without a previous time of calcium hydroxide paste [3]. Several studies ensure its good marginal adaptation that prevents bacteria leakage. In his in vitro study, Escribano-Escriva et al added that indirect ultrasonic vibration on the MTA in open apices teeth get better results and statistically significant in terms of filtration degree than those in which vibration is not performed [7]. Many searchers consider MTA as a reasonable setting time material (about 4 hours) [5,11]. But for Vidal et al, MTA has a prolonged setting time, handing difficulties and possible coronal staining. That is why they emphasized the use of Biodentine as a silicate-based cement. Although comparative studies between MTA and Biodentine revealed that both materials offer excellent sealing performance after direct pulp capping. They prevent the risk of subsequent microbial contamination [8].
Other limitations of MTA can be mentioned such as non-reinforcement of root canal dentin and a higher cost than calcium hydroxide [3,5].
For the esthetic management, the treatment was started with the internal tooth bleaching.
It is a conservative alternative esthetic treatment of non-vital discolored teeth. Careful examinations are necessary, since the method requires healthy periodontal tissues and a root canal that is properly obturated to prevent the bleaching agent from reaching the periapical tissues [11]. Both hydrogen peroxide and sodium perborate have been used, and various heat sources have been applied to speed up the reaction and improve the bleaching effect [12].
In our case, a 37% hydrogen peroxide gel was applied carefully without any heat sources. The medicament was placed in the pulp chamber, sealed, left for 3 days (because we have a high concentration of bleaching agent), and replaced regularly until achieving acceptable lightening is achieved. Some authors talk about the “walking bleach technique” [4].
To avoid the occurrence of internal and/or external resorption, different techniques and materials have been proposed. The most often cited solutions in literature are putting a sealed base as a cervical barrier at the root canal’s entrance, the careful choice of the bleaching agent and filling the pulp chamber with calcium hydroxide after obtaining the desired color [13,14]. Neutralization with this material is important because the bleaching agent may inhibit the composite resin polymerization.
If the seal of the temporary coronal-filling leaks, the residual bleaching agent will be ingested due to insufficient rinse of the sticky gel, and intracoronal dentin will be subject to discoloration from pigments in foods or beverages. Taking clinical photographs pre-, peri- and postoperatively is useful to demonstrate changes to the patient. The patient should be informed that bleaching is not permanent and not guaranteed before starting the treatment [15].
For the restoration of anterior teeth, it is essential to use opaque resin to simulate dentin. In general, it is recommended that such resin covers approximately half of the bevel made on enamel to disguise the fracture line. It is important to note that the bevel made on enamel improves the esthetics of the restoration and increases the area available for adhesion [16,17].
Management of immature root with a necrotic pulp and apical periodontitis is a challenging task. The infected root canal space cannot be disinfected with standard protocols. Obturation of the root canal is difficult due to the lack of apical barrier for containing the root filling material. Treatment of choice in such cases is the apexification procedure, i.e., establishing an apical barrier.
Before starting any internal dental bleaching, we should consider the amount of remaining tooth structure, quality of root canal treatment and health of periodontal tissues.